Ai Chatbot
Overview
This chatbot feature allows users to create, train, and deploy intelligent chatbots that respond to queries based on user-provided training materials. The process begins with an intuitive interface where users can design chatbots tailored to their specific needs. Users can customize the chatbot’s personality, ensuring it aligns with their brand or use case. The system supports multi-language functionality, making it accessible to a global audience.
The training module enables users to upload various types of materials, such as PDFs, Word documents, text files, plain text or even URLs. The chatbot uses embedding providers to analyze the content and structure it for intelligent responses.
Deployment is seamless, with users able to integrate the chatbot into third-party websites. The chatbot’s appearance can be customized to match the branding of the host platform, and any updates to its training materials are applied in real time, requiring no redeployment.
Once deployed, the chatbot interacts with users by generating contextually relevant responses based on its training. The chatbot also maintains a conversation history for smoother interactions and user satisfaction.
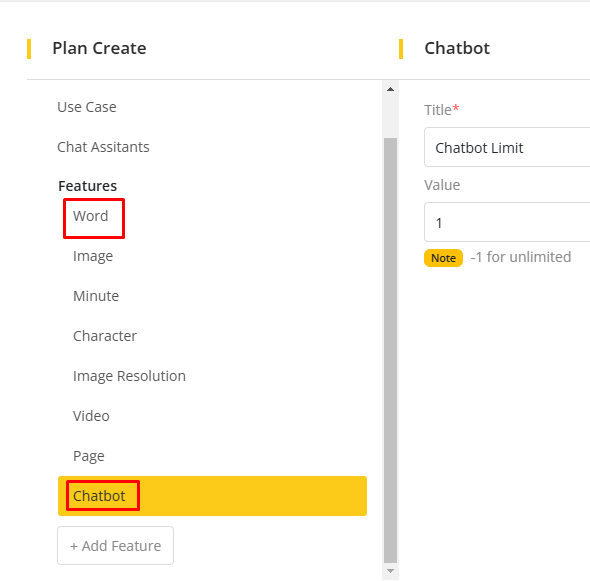
How to set the limits while creating a subscription plan
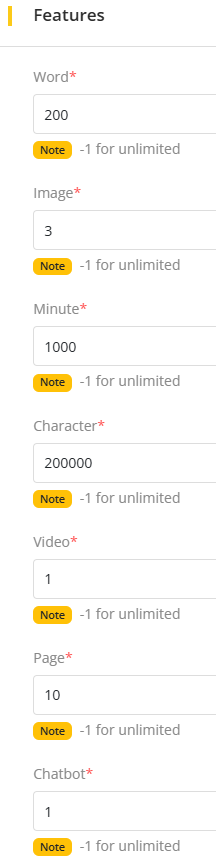
When creating a subscription plan, an admin has to provide the limits for generating contents using this feature. An admin has to set the limits for words for response generation through chatbot. Also the admin has to set the limits for chatbot for chatbot creation.
How to set the limits while creating a credit plan
While creating a credit plan, an admin has to provide the limits for generating contents using this feature. An admin has to set the limits for words and chatbot so that the user can generate content through chatbot after purchasing a credit plan.
Chatbot functionalities
A user can create as many chatbot as he is allowed to create based on the subscription plan that he has purchased. The user can afterwards customize the created chatbot and train it with training materials which are allowed as per the configuration. The user can then test the chatbot based on the training materials and can even integrate those created chatbot to any third-party site from where users can ask queries to the chatbot based on those materials and the chatbot will generate the respective responses based on the asked prompts. The conversation between any user and any chatbot from any third-party site will be listed and kept as a history. The user can check those chats afterwards.
Chatbot dashboard functionalities
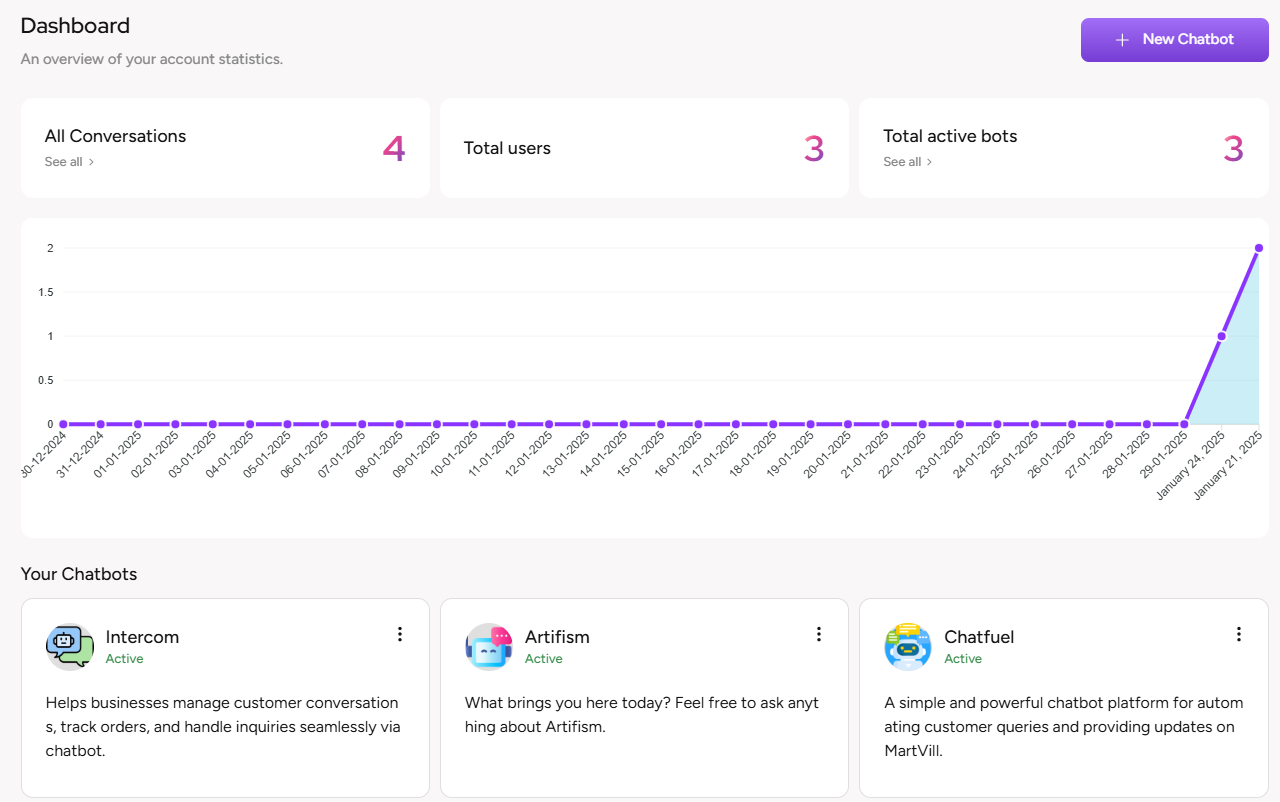
From the chatbot dashboard, the user can see the total number of conversations made by the chatbot in the system. The user can see the total list also by clicking on the See All option. The user can also see the total number of users who has used the available chatbot from any third-party site. Furthermore, the user can also see the number of the Total Active Bots of the system and can even see the entire Chatbot list by clicking on the See All option. On the chart, the user can see the number of users who has used the available chatbot on each day of the month. Finally, the user can see the total chatbot of the system and can perform some operations on them by clicking on the three dot icon. This will show the user the operations which can be performed on those specific chatbot. Also, the user can go to the Chatbot creation form from the dashboard by clicking on the New Chatbot button.
Chatbot list and its operations
On the chatbot list page, the user can all the available chatbot of the users and can perform the same operations as Dashboard. The user can also filter the chatbot list and can even create a new Chatbot if that is allowed based on the Subscription Plan. The user can see the details of any particular chatbot, can change the status of any chatbot(if any chatbot is Active then can turn it to Inactive and vice-versa), can see the conversation list of that particular chatbot, can train that particular chatbot, can test that particular chatbot based on the training materials, can customize that specific chatbot or can delete that chatbot even.

Creating a new Chatbot
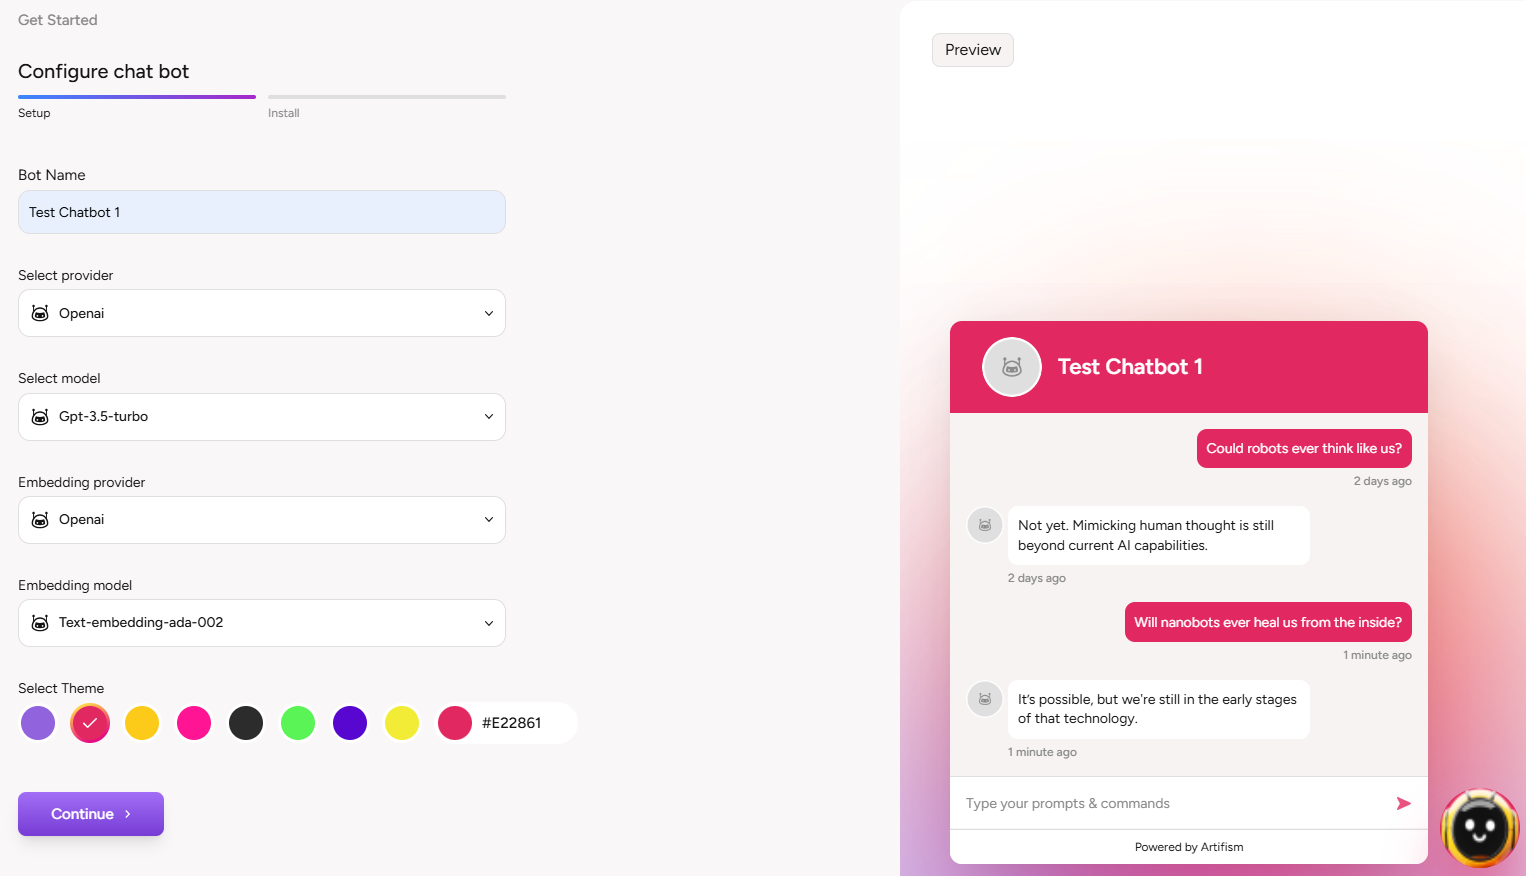
While creating a new chatbot, the user has to provide a name to the chatbot. Then the user has to select a provider and a model through which the chatbot will generate responses. These providers and models can be configured.
The provider and models related options are coming from the provider settings related to this feature. You can find the provider settings for Ai Chatbot feature from the following link: (how to configure provider settings for chatbot)
Then the user has to select an embedding provider and model through which the chatbot will embed the training materials. This provider and models can be configured.
The provider and models related options are coming from the provider settings related to Ai Embedding. You can find the provider settings for Ai Embedding from the following link: (how to configure provider settings for Ai Embedding)
Finally, the user has to select a theme for the chatbot which can be customized later on. After selecting a theme, the user can see the preview of the chatbot on the right side of the screen.
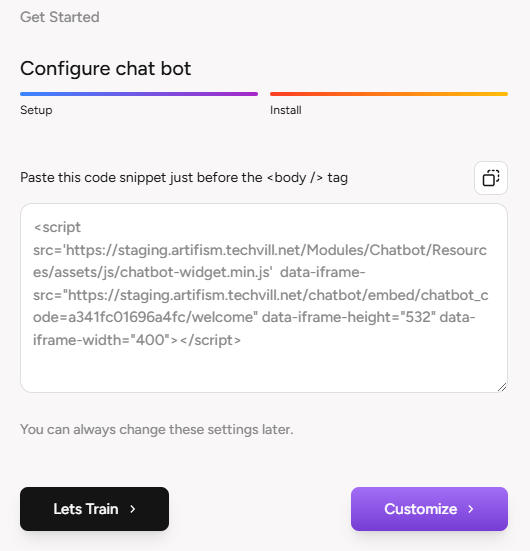
After all the configuration is done, the user has to click on the Continue button to complete the chatbot creation process.
After the chatbot creation is completed, the admin will receive a code snippet to paste on any third-party site. The admin can even train any created chatbot or can customize the chatbot further.
When a new chatbot is created, the available chatbot balance on the subscription/credit plan will be deducted.
How to customize a Chatbot
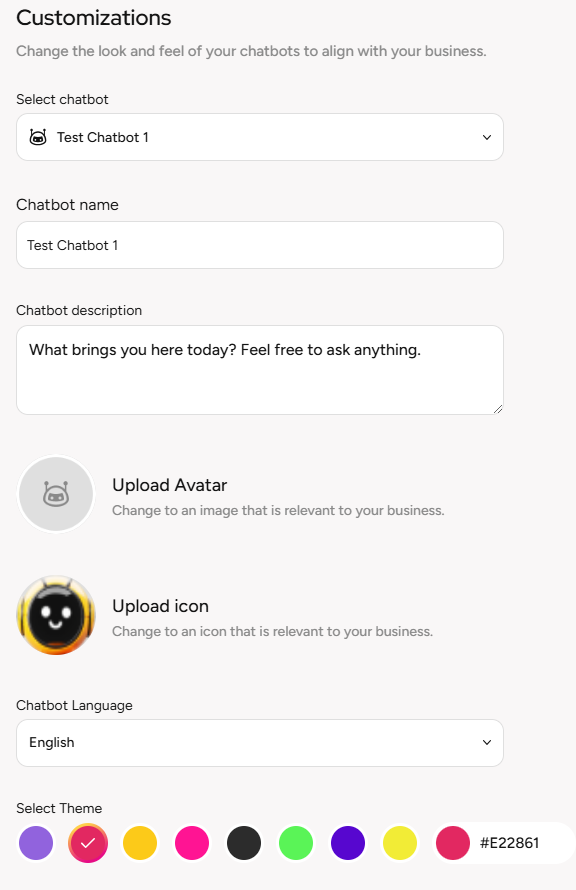
After going to the customization section, the user has to select a chatbot. The user then can edit the chatbot name, can edit the default chatbot description which will appear as the default chatbot message on any site. Furthermore, the user can upload the chatbot avatar and floating image as well. Finally, the user can select a language for the chatbot which has been configured by the admin and can even change the chatbot theme as well. After making all the necessary changes, the user has to click on the Save Changes button to save all the changes made by him.
How to train a Chatbot
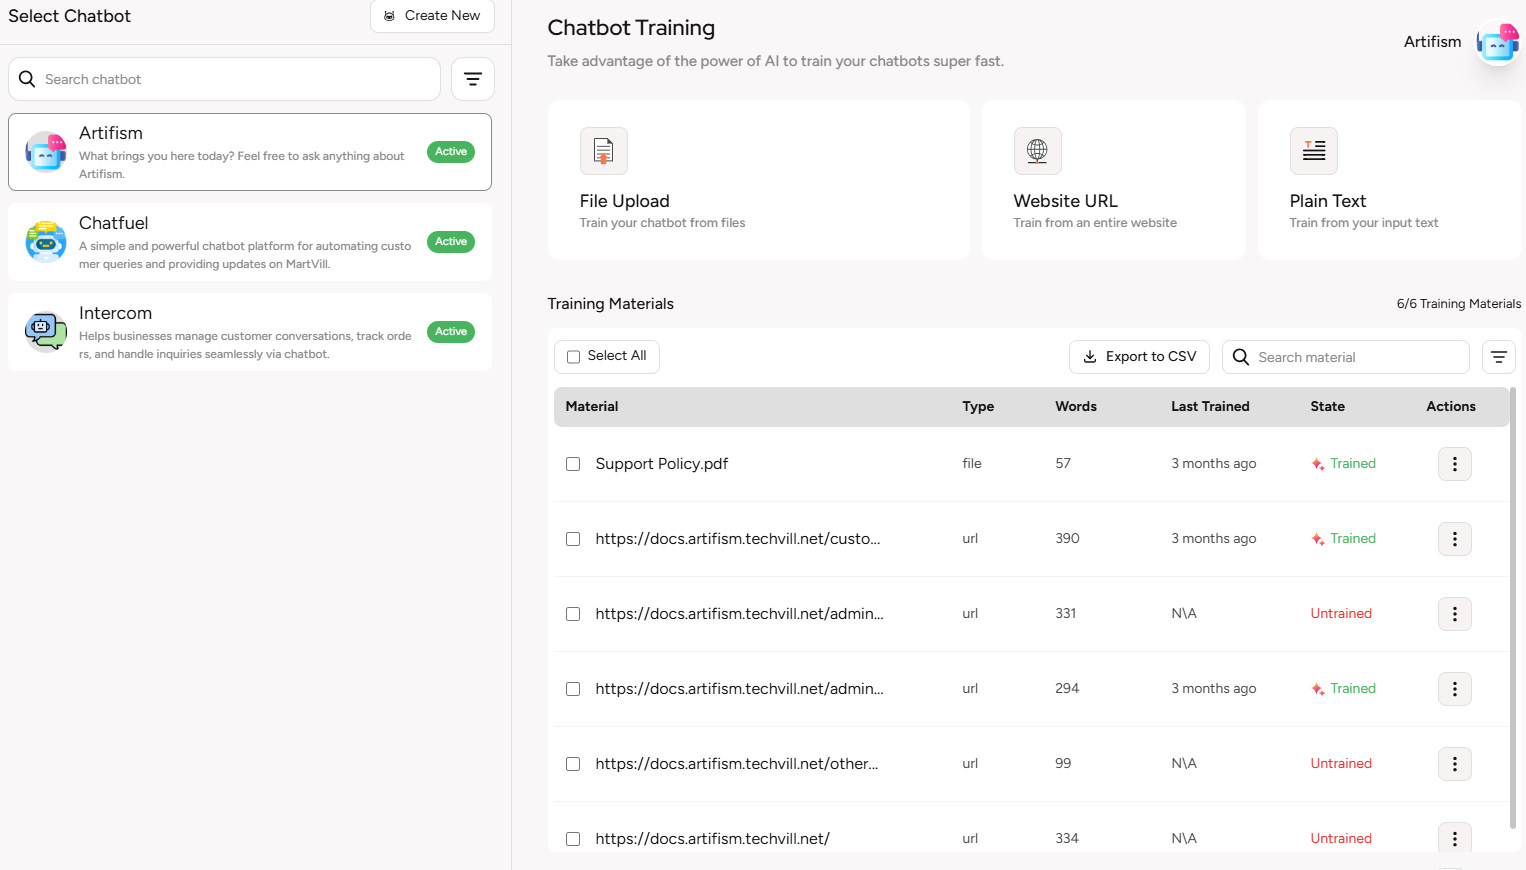
After going to the training section, the user has to select a chatbot from the left panel. The user can filter the left panel either by creation time or through names in alphabetical order. The user can also filter the left panel by chatbot status. The user can also go to the Chatbot creation form from the training section.
On the right panel, the user will receive all the available training options that is configured by the admin. There are options to train the chatbot through files, through webpage URLs and Plain text. When the user tries to train the chatbot through files, it has to be of PDF, DOC, DOCX or TXT type. The maximum file size or limit of the total number of files can be configured by the admin. While training a chatbot using Webpage URL, the admin can configure total number of webpage a user can use to train a chatbot. The user has to provide links of webpage with http/https. Finally, the user can even train a chatbot with plain text also. The user has to provide the text on the text area.
On the training material list, the user will see all the training materials for any specific chatbot. The user can see the state of the training materials which can either be Trained or Untrained. Finally the user can delete any training materials or all materials. The user can also train any untrained material or as a whole. Finally the user can filter the training material list through keywords, training material type or state. The user can also export the training material list in CSV also.
How to test a Chatbot
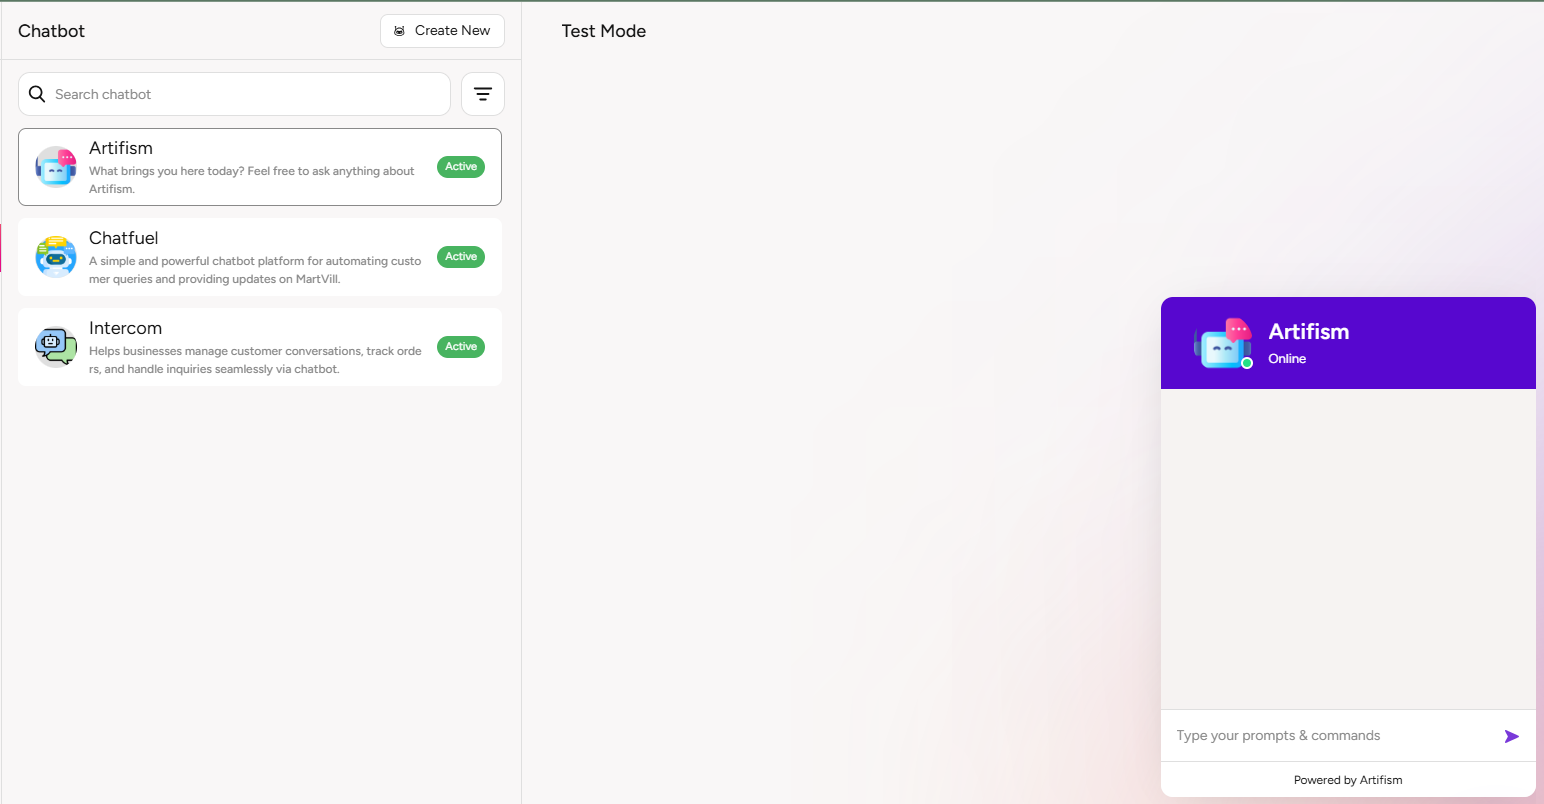
In order to test a chatbot, the chatbot must have to be trained. After training a chatbot, the user can go to the Test option and provide a prompt and check if the chatbot is providing appropriate responses based on those training materials. The user has to select a chatbot from the left panel and test that chatbot. The user can go to the Chatbot creation form from the Test section.
The allowed word limit for the user based on the subscription plan/credit plan will be deducted once a response is generated by the chatbot.
Conversation list
If the chatbot is implemented to any third-party site and any user makes any conversation with that chatbot then the conversation will be saved on the list where the user can see the conversation or can even delete the conversation as well. The user can select any specific conversation and see its details or delete it.

Once a conversation is made the words balance available for the user will be deduced automatically.