Subscription — Administrator User Manual
This manual explains how to manage subscriptions, credit packs, members, payments, and related settings in the admin panel. It is written for site owners and staff who are not technical. You do not need coding knowledge to follow these steps.
For customers: User account.
What you will manage
The Subscriptions section in the admin sidebar is where you control how customers pay for and use your AI platform. It has seven main areas:
| Menu item | What it is for |
|---|---|
| Plans | Recurring subscription packages (for example monthly or yearly plans). |
| Credits | One-time credit packs customers buy without a full subscription renewal. |
| Members | A list of who is subscribed to which plan (subscription records per customer). |
| Payments | Money received, invoices, and payment status. |
| Settings | Rules for plan changes, renewal, and which credit balance is used first. |
| Credit Pricing | How much each AI tool or model costs in credits. |
| Usage History | A log of customer AI usage and credits consumed. |
Tip: Members in the admin panel is not the same as Team members in a customer account. Admin Members = subscription records. Customer Team members = people sharing one customer’s plan.
Before you start
- Log in to the admin panel with an account that has permission to manage subscriptions.
- In the left sidebar, open Subscriptions.
- If you do not see a menu item, your role may not have access—ask your main administrator.
Best practice: After changing plans, credits, or settings, open your website Pricing page as a test customer would and confirm everything looks correct.
Plans
What Plans are
Plans are what customers buy to use your AI. They pay on a schedule (like every month or year), or they pay once for lifetime access. Each plan says how much they can use in that time—for example credits.
A fresh install often includes example plans such as Starter, Premium, and Platinum. You can rename them, edit them, or create your own.
Why you use Plans
- To sell access to your platform on a recurring or long-term basis.
- To define what each tier includes (which tools are on, how many subscription credits they get each cycle, trials).
- To control how plans appear on your public pricing page.
How Plans work (simple overview)
- You create a plan in the admin panel and set prices for each billing cycle you want to sell.
- You enable which modules/tools customers may use (All Features) and how many credits per billing cycle they receive (one shared credit pool, not separate caps per tool).
- Credit Pricing decides how fast credits are spent when they run text, images, video, and so on.
- When the plan is Active, customers can buy it from Pricing → Subscription on your website.
- After payment, the customer’s subscription record appears under Members, and they can use paid features until the plan expires or is cancelled.
View the plan list
Go to: Subscriptions → Plans
What you see
A table of all subscription plans with basic information (name, status, and so on).
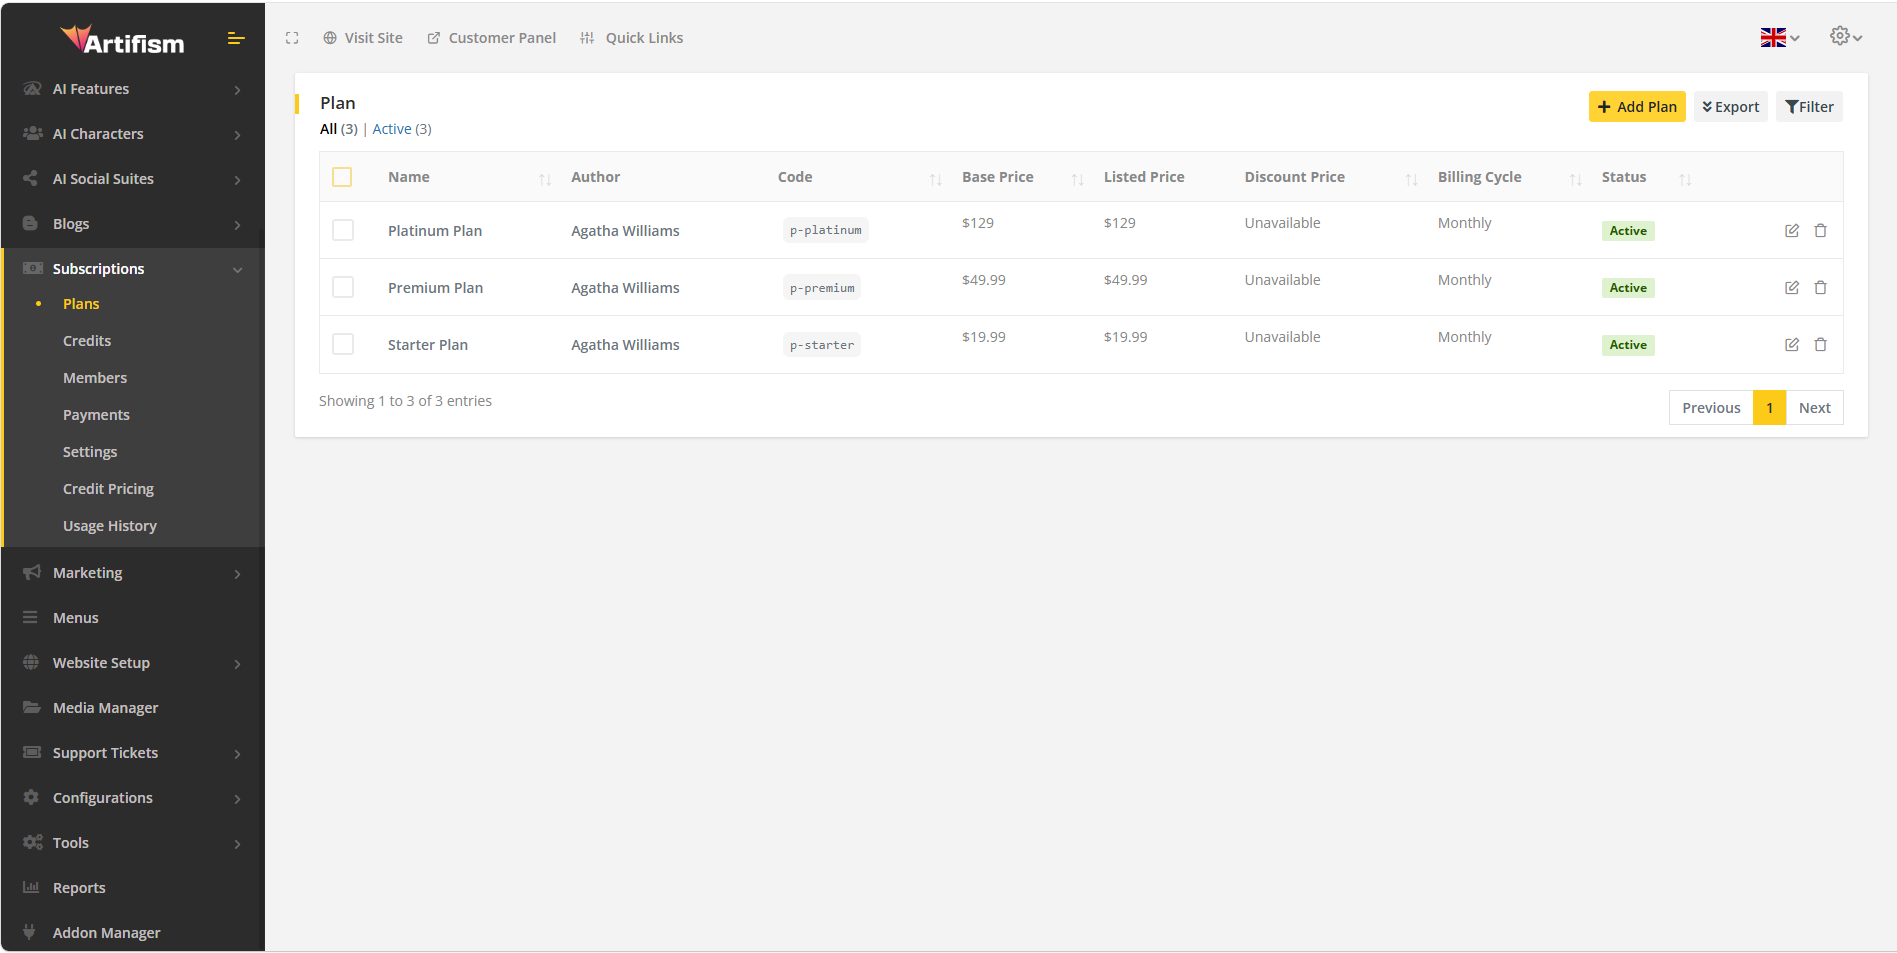
Buttons and actions on the list page
| Button / action | What it does |
|---|---|
| Add Plan | Opens the form to create a new subscription plan. |
| Filter (funnel icon) | Opens search and status filters. |
| Export | Downloads the plan list as CSV or PDF (if your role allows). |
| Edit (row action) | Opens the selected plan for changes. |
| Delete (row action) | Removes a plan (use carefully—existing customers may be linked to it). |
| Batch delete | Deletes multiple selected rows at once. |
| Search box | Finds plans by keyword. |
| Status filter | Shows All Status, Active, Inactive, or Pending only. |
Step-by-step: find a plan
- Go to Subscriptions → Plans.
- Click the Filter icon if you need to narrow the list.
- Type a keyword or choose a Status.
- The table updates to show matching plans.
After this: You can edit or delete a plan from its row, or click Add Plan to create a new one.
Create a new plan
Go to: Subscriptions → Plans → Add Plan
The create screen has a left menu of tabs. Start on General (plan name, pricing, credits, status), then open the other tabs. Click Save at the bottom when finished. Use Cancel to go back without saving.
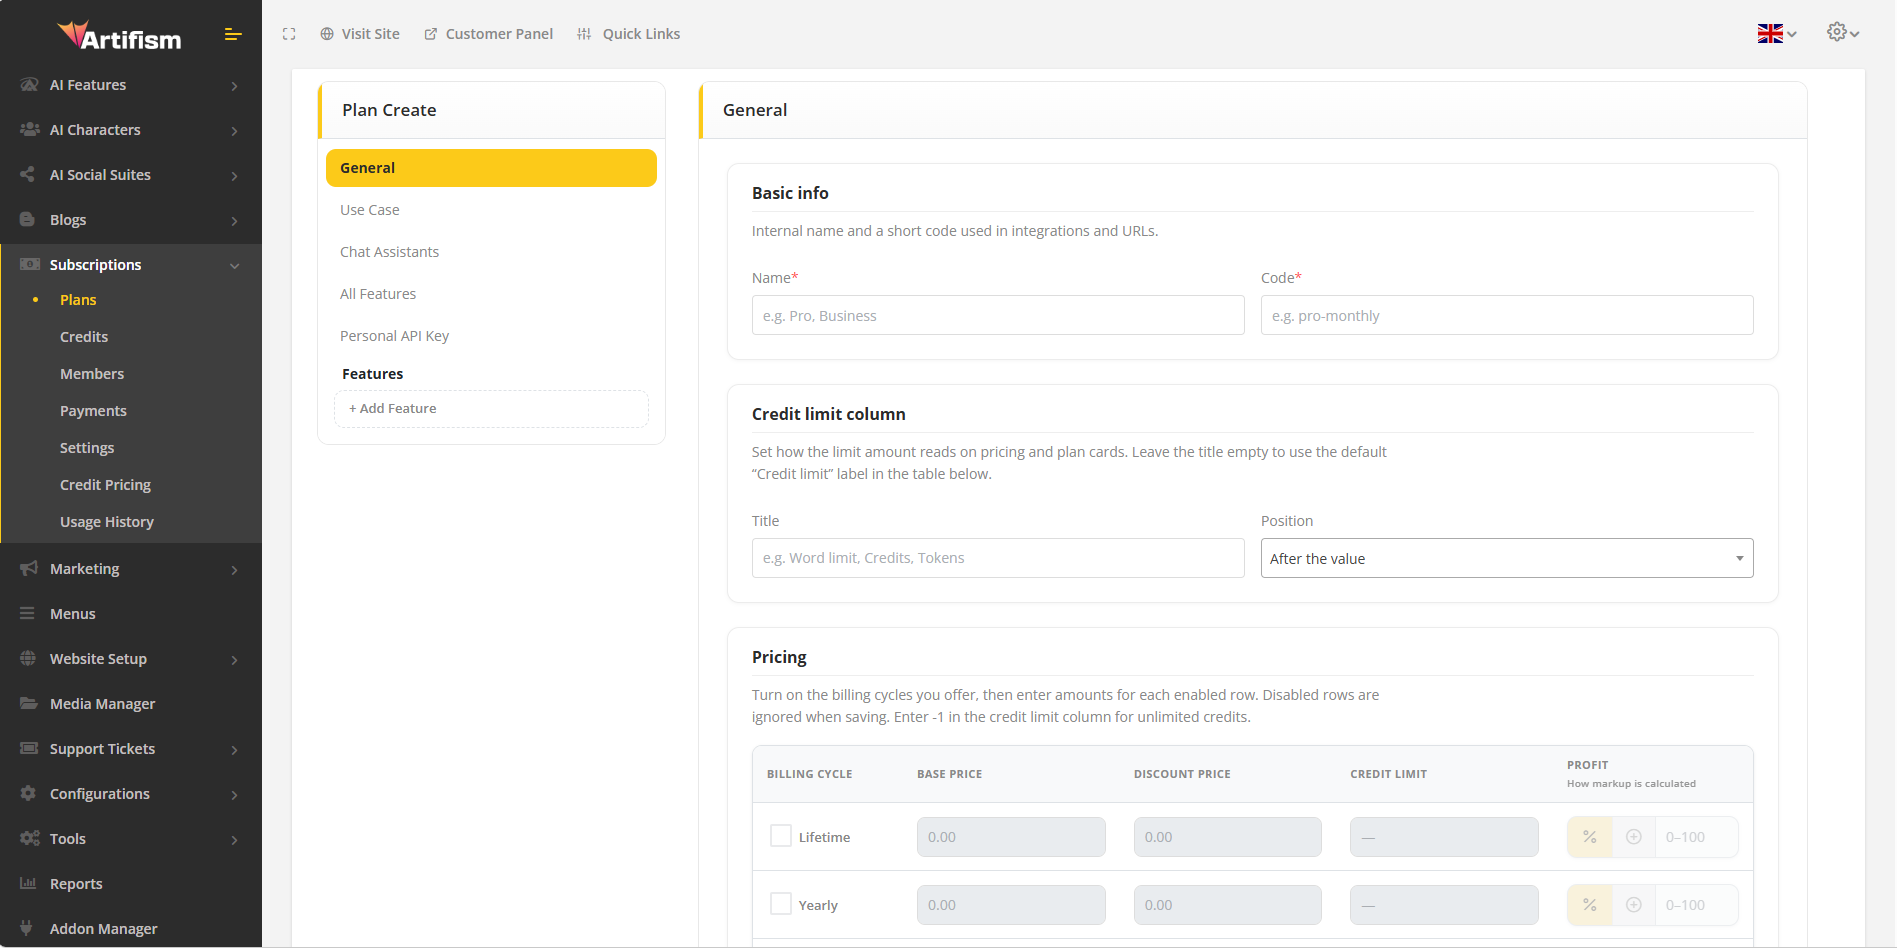
Tab: General
The General tab is one long page with several blocks. Work from top to bottom.
Block: Basic info
| Field | What it means | What to enter |
|---|---|---|
| Name | The plan name customers see (for example “Pro” or “Business”). | At least 3 characters. |
| Code | A short internal ID (for reports and integrations). | At least 3 characters. Example: pro-monthly. |
Block: Credit limit column
This only changes how the credit amount is labeled on your pricing table and plan cards—not how many credits the customer gets (that is in the Pricing table below).
| Field | What it means |
|---|---|
| Title | Custom label for the credit column. Examples: Credits, Tokens. Leave empty to use the default Credit limit. |
| Position | Before the value or After the value (for example “5000 Credits” vs “Credits 5000”). |
Block: Pricing
This is the main table where you turn billing cycles on and set price + credits for each row.
Instruction on screen: Turn on the billing cycles you offer, then enter amounts for each enabled row. Disabled rows are ignored when saving. Enter -1 in the credit limit column for unlimited credits.
| Column | What it means | What to enter |
|---|---|---|
| Billing cycle (checkbox) | Turns that row on or off. | Tick only the cycles you sell for this plan. Unticked rows are ignored when you save. |
| Base price | Normal price for that cycle. | Example: 29.00 for monthly. Grayed out until the row is enabled. |
| Discount price | Optional sale price. | If filled, customers may see this instead of base price. Leave 0.00 if not used. |
| Credit limit | How many subscription credits the customer gets for that billing cycle (one shared pool). | Example: 10000. Enter -1 for unlimited credits for that cycle. |
| Profit | Optional markup on top of base price. | Choose % (percentage of base price, usually 0–100) or + (fixed amount added). Enter the value in the box beside the toggle. |
Billing cycles in the table:
| Row label | Typical use |
|---|---|
| Lifetime | One payment, long-term access. |
| Yearly | Billed once per year. |
| Monthly | Billed every month (most common). |
| Weekly | Billed every week. |
| Custom days | A fixed number of days you define (see below). |
Custom days only: When you tick Custom days, a extra row appears: Custom period length → Number of days (for example 15 means each period lasts 15 days).
Tip: You can enable more than one cycle on the same plan (for example both Monthly and Yearly) with different prices and credit limits on each row.
Note: Credits are spent according to Subscriptions → Credit pricing (each AI model/tool has a rate). The Credit limit column is how many credits they start with each period—not separate limits per Word/Image/etc.
Block: Sort & visibility
| Field | What it means |
|---|---|
| Sort order | Order on the website pricing list. Lower numbers usually appear first. |
| Trial days | Free trial length. Enter 0 for no trial, or 7 for seven days free. |
Block: Settings
| Field | Options | Meaning |
|---|---|---|
| Status | Active | Plan can be sold; shows on pricing when other rules allow. |
| Inactive | Hidden from new purchases. | |
| Pending | Draft—not ready for customers yet. |
After you click Save: The plan is saved. If Status is Active and at least one billing cycle row is enabled with prices, the plan can appear on your website Pricing page.
Tab: Use Case
Controls which pre-built use case templates subscribers on this plan can access.
| Field | What to do |
|---|---|
| Use Case Category | Select one or more categories. |
| Use Case Template | Select which templates are included. |
Why it matters: Customers on a cheaper plan might get fewer templates; a higher plan might get all of them.
Tab: Chat Assistants
Controls which AI chat assistants are available on this plan.
| Field | What to do |
|---|---|
| Chat Category | Select allowed chat categories. |
| Chat Assistants | Select specific assistants customers may use. |
Tab: All Features
A grid of on/off switches for major product areas (each tool or module your platform offers).
- On (checked): Customers on this plan can use that feature.
- Off (unchecked): That feature is blocked for this plan.
Example: Turn off Image Maker on a starter plan and turn it on only on premium plans to encourage upgrades.
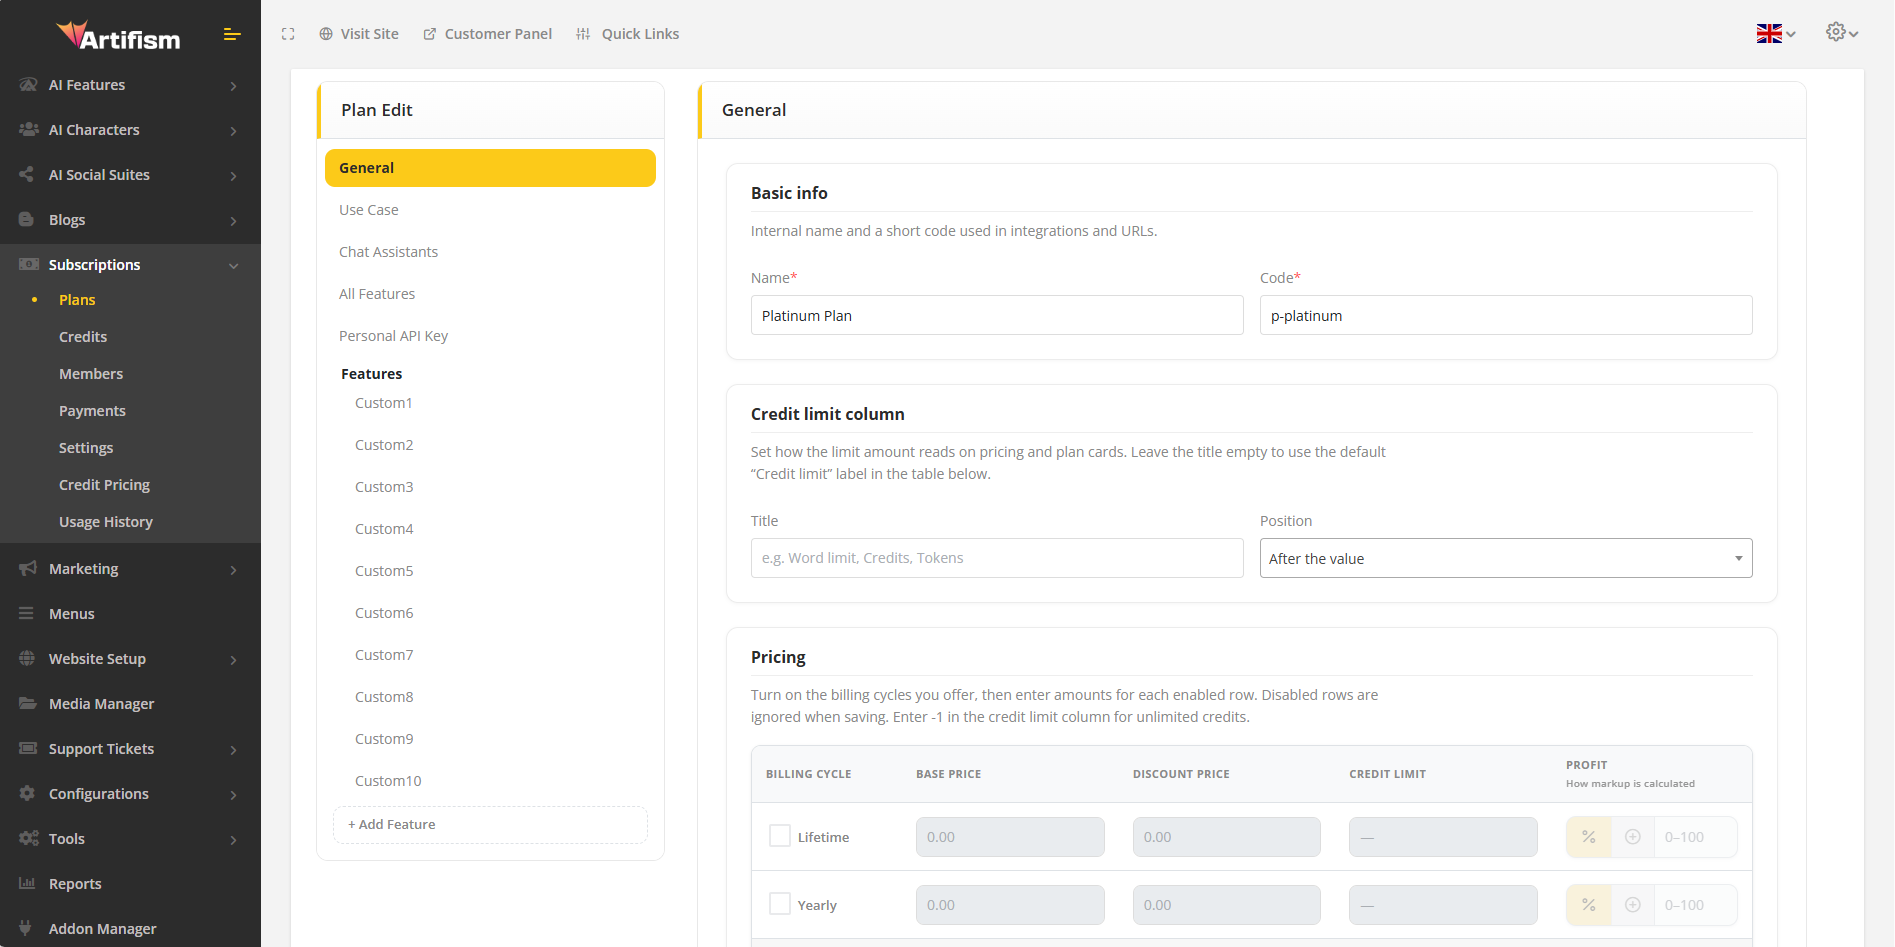
Edit or delete a plan
Edit
- Go to Subscriptions → Plans.
- Find the plan and click Edit.
- Change any tab (General, Use Case, Chat Assistants, All Features, credits-per-cycle fields, and so on).
- Click Save.
After Save: Existing subscribers keep their subscription; changes usually affect new purchases and renewals depending on your setup. Always test after major edits.
Delete
- Click Delete on the plan row.
- Confirm when asked.
Warning: Deleting a plan that customers still use can cause errors or support issues. Prefer setting status to Inactive instead of deleting if anyone is still on that plan.
Practical example: create a “Pro Monthly” plan
- Add Plan → General → Basic info: Name =
Pro, Code =pro-monthly. - Credit limit column: Title =
Credits, Position = After the value. - Pricing: Tick Monthly only. Base price =
29, Discount price =0(or a sale price). Credit limit =25000. Profit =0or your markup. - Sort & visibility: Sort order =
2, Trial days =7. - Settings: Status = Active.
- All Features tab: Turn on the tools Pro users should have.
- Click Save.
- Check Credit pricing so model rates match how fast 25000 credits should be used.
- Open your site Pricing page and confirm Pro shows with monthly price and credits.
Credits
What Credits are
Credits (also called small credit packages or credit packs) are one-time purchases. They are ideal for customers who:
- Do not want a recurring subscription, or
- Need a top-up of credits beside their main subscription balance.
Unlike a subscription plan, a credit pack does not renew automatically unless the customer buys again.
Why you use Credits
- To sell smaller, cheaper bundles.
- To let customers try your service without committing to a monthly plan.
- To offer add-on capacity alongside subscriptions.
View the credit list
Go to: Subscriptions → Credits
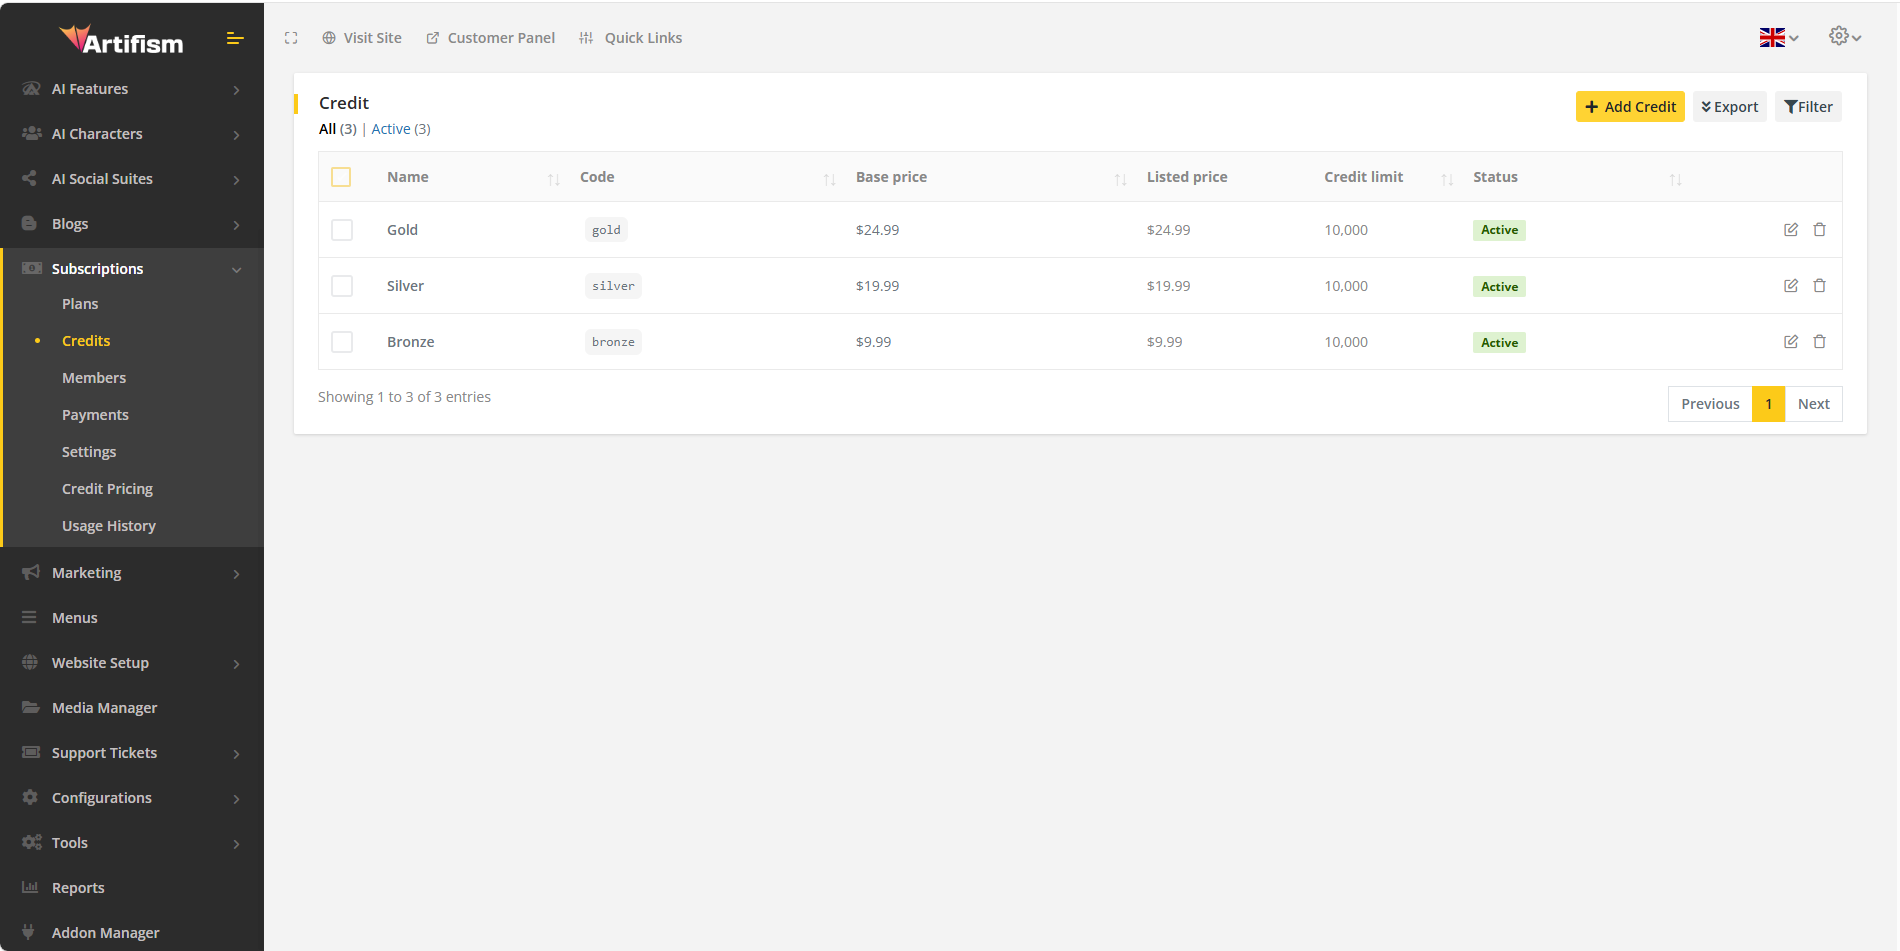
Buttons and actions
| Button / action | What it does |
|---|---|
| Add Credit | Create a new credit pack. |
| Filter | Search by keyword and Status (Active / Inactive). |
| Export | Download list as CSV or PDF. |
| Edit / Delete | Change or remove a credit pack. |
| Batch delete | Remove multiple packs at once. |
Create a credit pack
Go to: Subscriptions → Credits → Add Credit
Note: On some screens the second step may still be named Features in the menu, but your product only asks for one credit total for the pack (not separate Word/Image rows). Use that single number as Credit limit below.
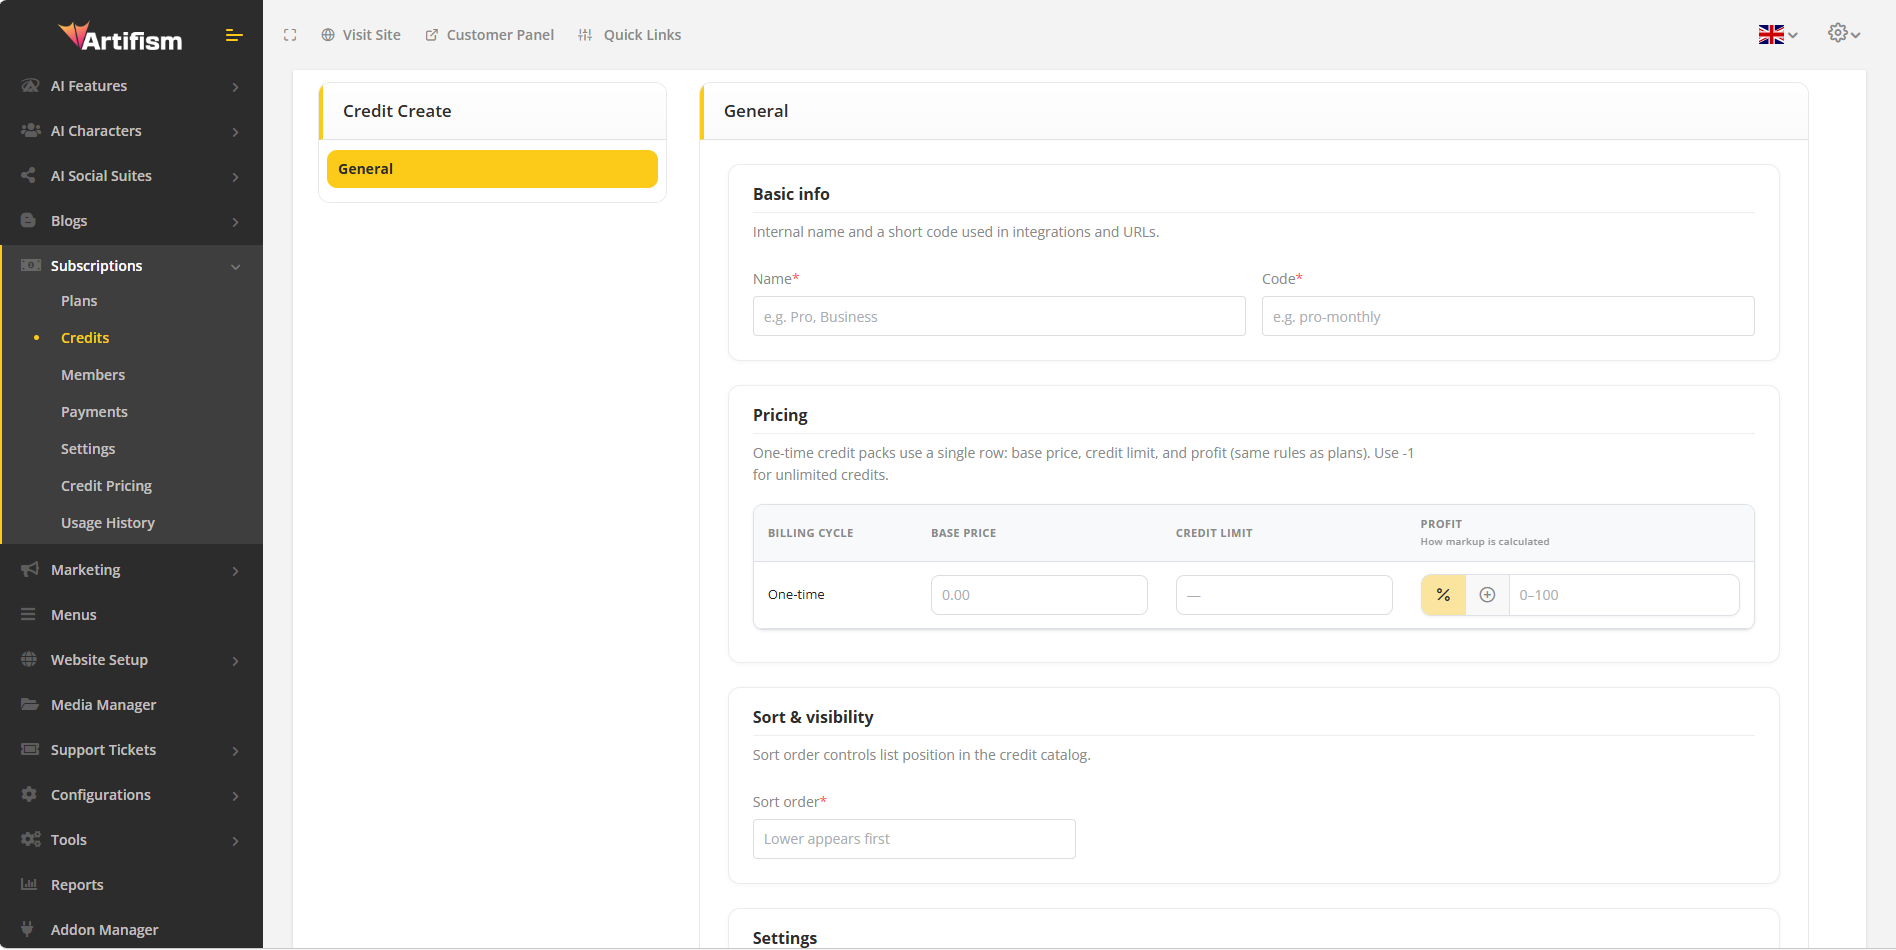
Tab: General
| Field | What it means | Tips |
|---|---|---|
| Name | Name shown to customers (for example “Small Pack”). | At least 3 characters. |
| Code | Internal identifier. | At least 3 characters; keep it unique. |
| Price | What the customer pays once. | Use your normal currency format. |
| Sort Order | Order on the Credit tab of the pricing page. | Lower numbers appear first. |
| Status | Active = customers can buy it. Inactive = hidden. | Use Inactive while drafting. |
Tab: Pricing (credit pack — unified pool)
Credit packs use one total credit amount, not separate limits per Word/Image/etc.
| Field | What it means |
|---|---|
| Base price / Price | What the customer pays once for this pack. |
| Credit limit | Total credits added to their account when they complete purchase (for example 5000). Use -1 only if your system supports unlimited credits for that pack and your policy allows it. |
| Profit (if shown) | Optional markup or profit display rules for the storefront—follow your admin labels. |
Click Save when finished.
What happens next:
- Active packs appear on your website under Pricing → Credit tab.
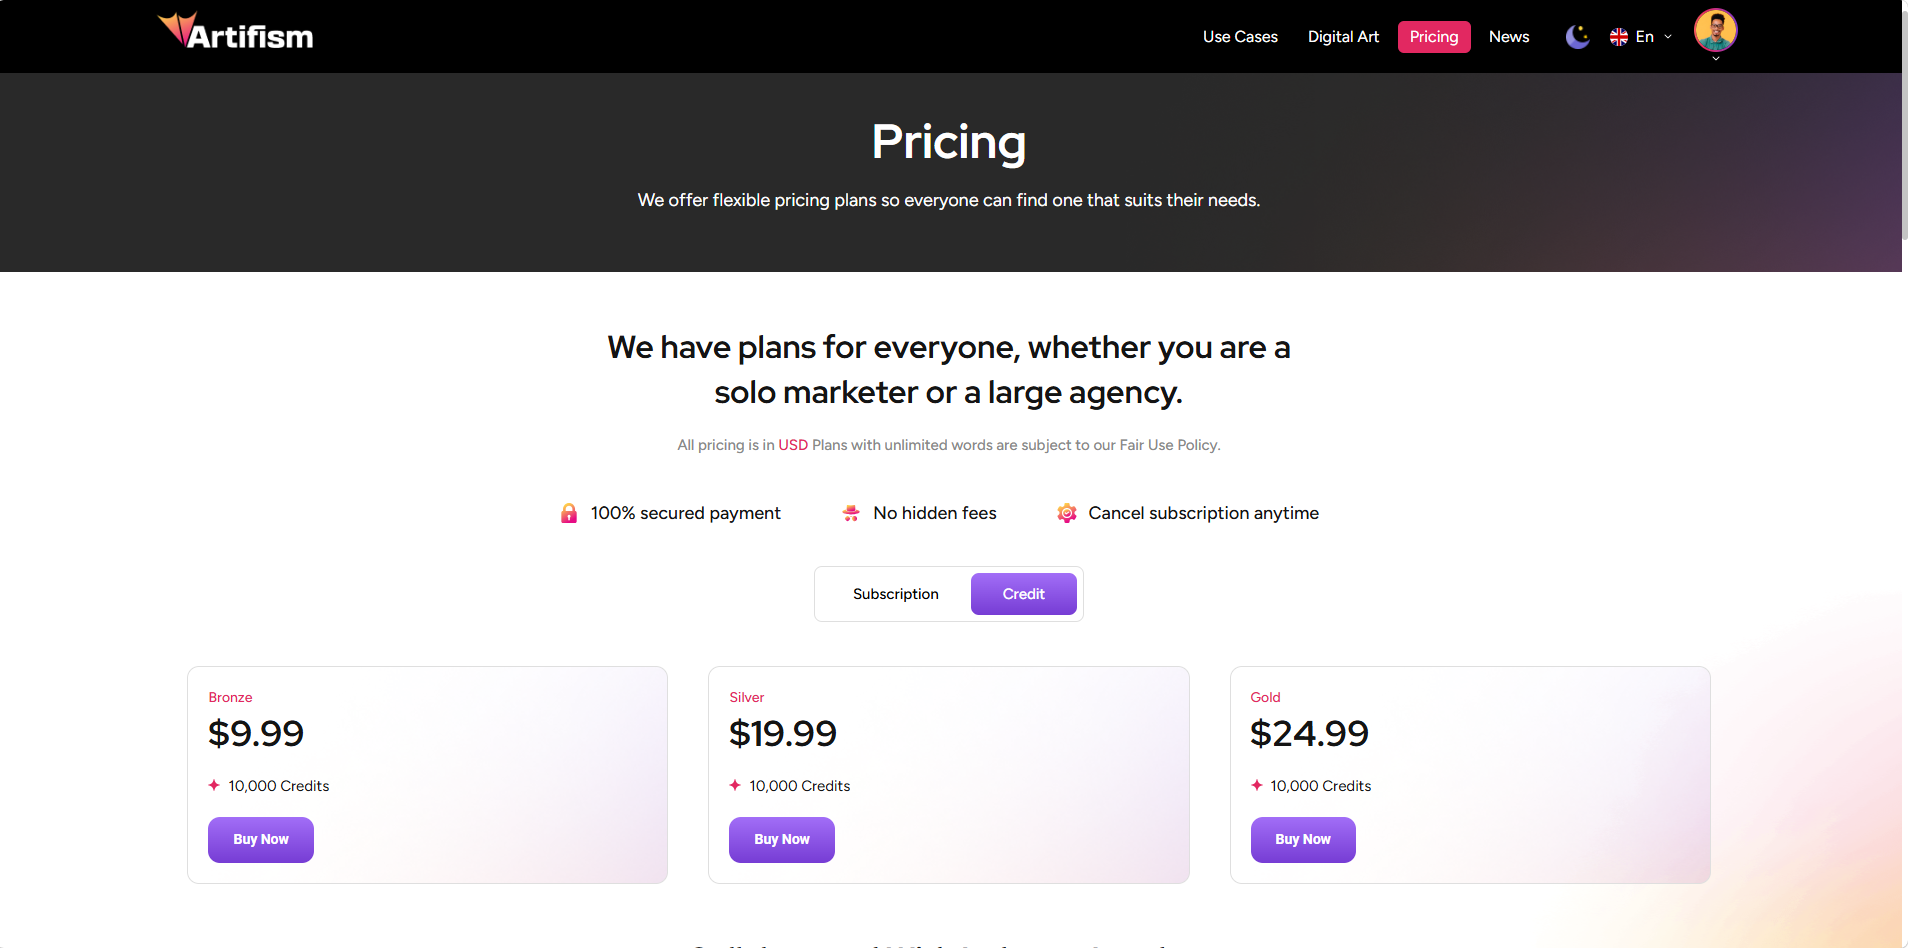
- Customers click Buy Now to purchase.
- After payment, their credit balance increases and they see remaining credits under Customer panel → Account → Credit (alongside subscription credits if they have both).
- Spending uses Credit pricing rates for each tool or model.
- Invoices appear under the customer’s Billing history.
Edit or delete a credit pack
Same as plans: open Credits, click Edit or Delete, make changes, Save.
Tip: If a pack was already sold, editing the credit limit may affect how much remains according to system rules—test after changes. When in doubt, create a new pack instead of heavily changing an old one.
Practical example: “Starter Credits” pack
- Add Credit → General: Name =
Starter Credits, Code =starter-credit, Sort =1, Status = Active. - Pricing: Price =
9.99, Credit limit =8000(they receive 8000 credits in their pool when they buy). - Save and check Pricing → Credit on the website.
Members
What Members are
The Members screen lists subscription records—one row per customer subscription (or credit purchase record, depending on type). It answers: Who bought what, when, and what is their status?
This is your main screen for support and manual fixes.
Why you use Members
- See every active, pending, or expired subscription.
- Manually assign a subscription to a customer (complimentary access, offline payment, fixes).
- Edit dates or status when something went wrong at checkout.
- Preview payment details linked to a member.
View the members list
Go to: Subscriptions → Members
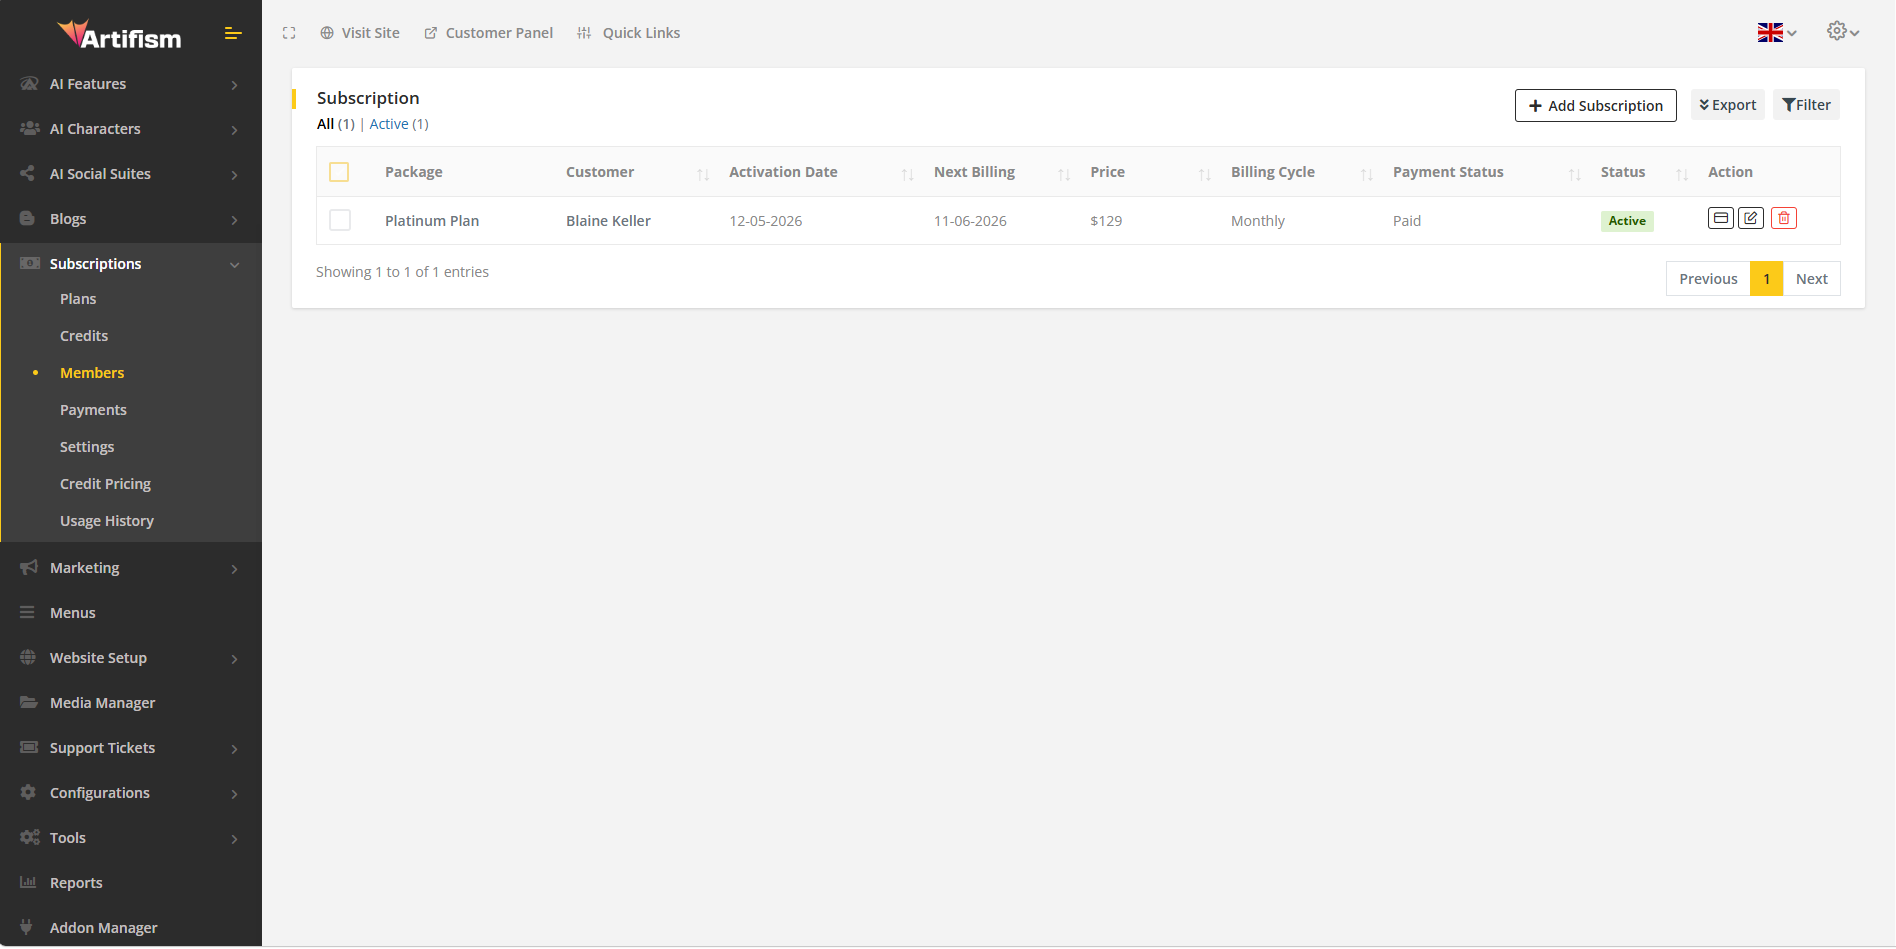
Filter by status
| Status | Meaning (simple) |
|---|---|
| Active | Subscription is currently in force; customer should have access. |
| Pending | Waiting for payment or activation. |
| Inactive | Not in use. |
| Expired | Billing period ended. |
| Cancel | Customer or admin cancelled; may still have access until period ends depending on rules. |
Use Search and Filter like on other list pages. Export to CSV/PDF when needed.
Row actions
| Action | What it does |
|---|---|
| Edit | Open the full subscription record. |
| Delete | Remove the record (use only when you are sure). |
| Preview | View payment-related information where available. |
Add a subscription manually
Go to: Subscriptions → Members → Add Subscription
Fill in three tabs, then Save.
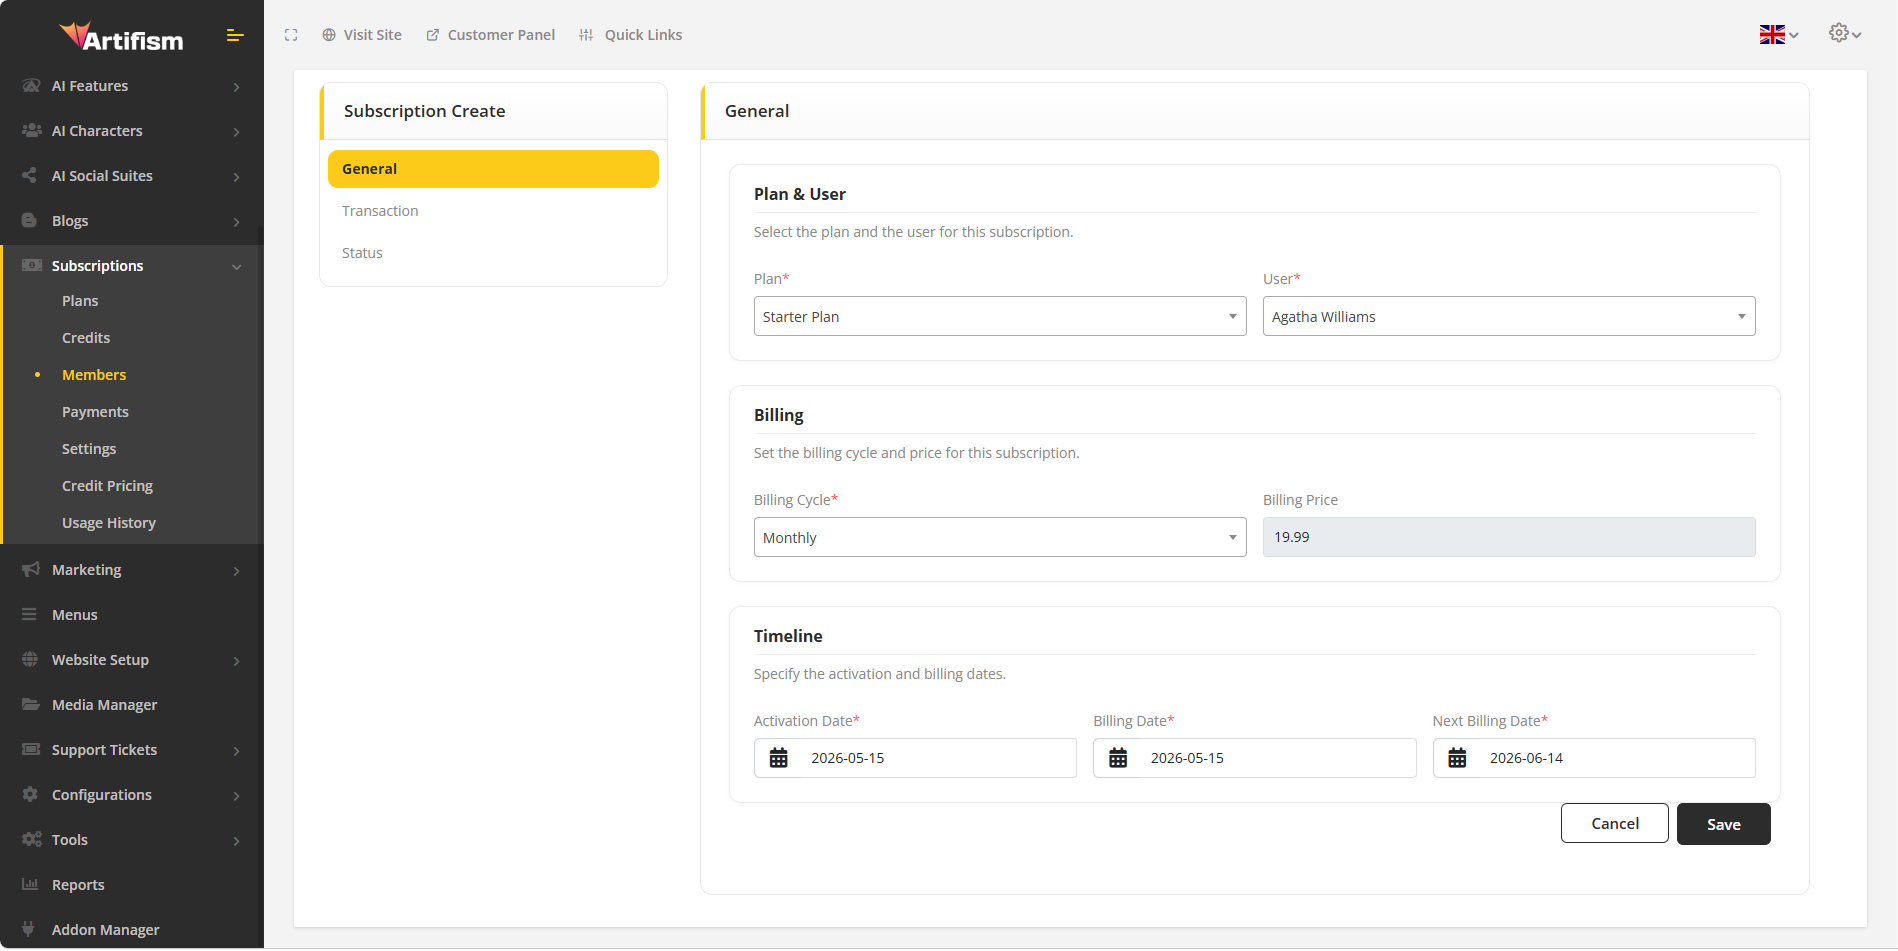
Tab: General
| Field | What it means |
|---|---|
| Plan | Which subscription package this member gets. |
| User | Which registered customer receives it. |
| Billing Cycle | Yearly, monthly, weekly, or days. |
| Duration | For “days” cycle only—length of access in days. |
| Billing Price | Price for this cycle (often filled automatically from the plan). |
| Activation Date | When the subscription starts. |
| Billing Date | Date of this billing event. |
| Next Billing Date | When the next charge or renewal is due (if applicable). |
Tab: Transaction
Read-only style fields showing money totals:
| Field | Meaning |
|---|---|
| Amount Billed | Total billed. |
| Amount Received | Money already received. |
| Amount Due | Still owed. |
Tab: Status
| Field | Options | Meaning |
|---|---|---|
| Payment Status | Paid / Unpaid | Has the customer paid? |
| Status | Active, Pending, Inactive, Expired, Cancel | Overall subscription state. |
After Save: The customer should be treated as subscribed according to the status you set. They can log in and see the plan under their account.
Edit a member subscription
- Click Edit on a member row.
- Tabs include General, Transaction, Status, and often Use Case, Chat Assistants, All Features, plus subscription credit allowance / usage fields where shown—the same ideas as the plan, but for this one customer’s subscription.
- Where subscription credits are shown, you may see remaining vs used (often partly read-only)—useful to see how much of their cycle allowance they have burned through.
- Click Save.
Use case: A customer paid outside the website—you set Payment Status to Paid and Status to Active. Or you extend Next Billing Date after a billing dispute.
Payments
What Payments are
The Payments screen is your financial ledger for subscription charges and one-time credit purchases. Use it to answer: Was this invoice paid? and What did the customer buy?
Why you use Payments
- Review all incoming money linked to subscriptions and credits.
- Open invoices for customers or accounting.
- Filter unpaid or pending items.
- Mark certain one-time credit payments as paid from the invoice screen.
View the payments list
Go to: Subscriptions → Payments
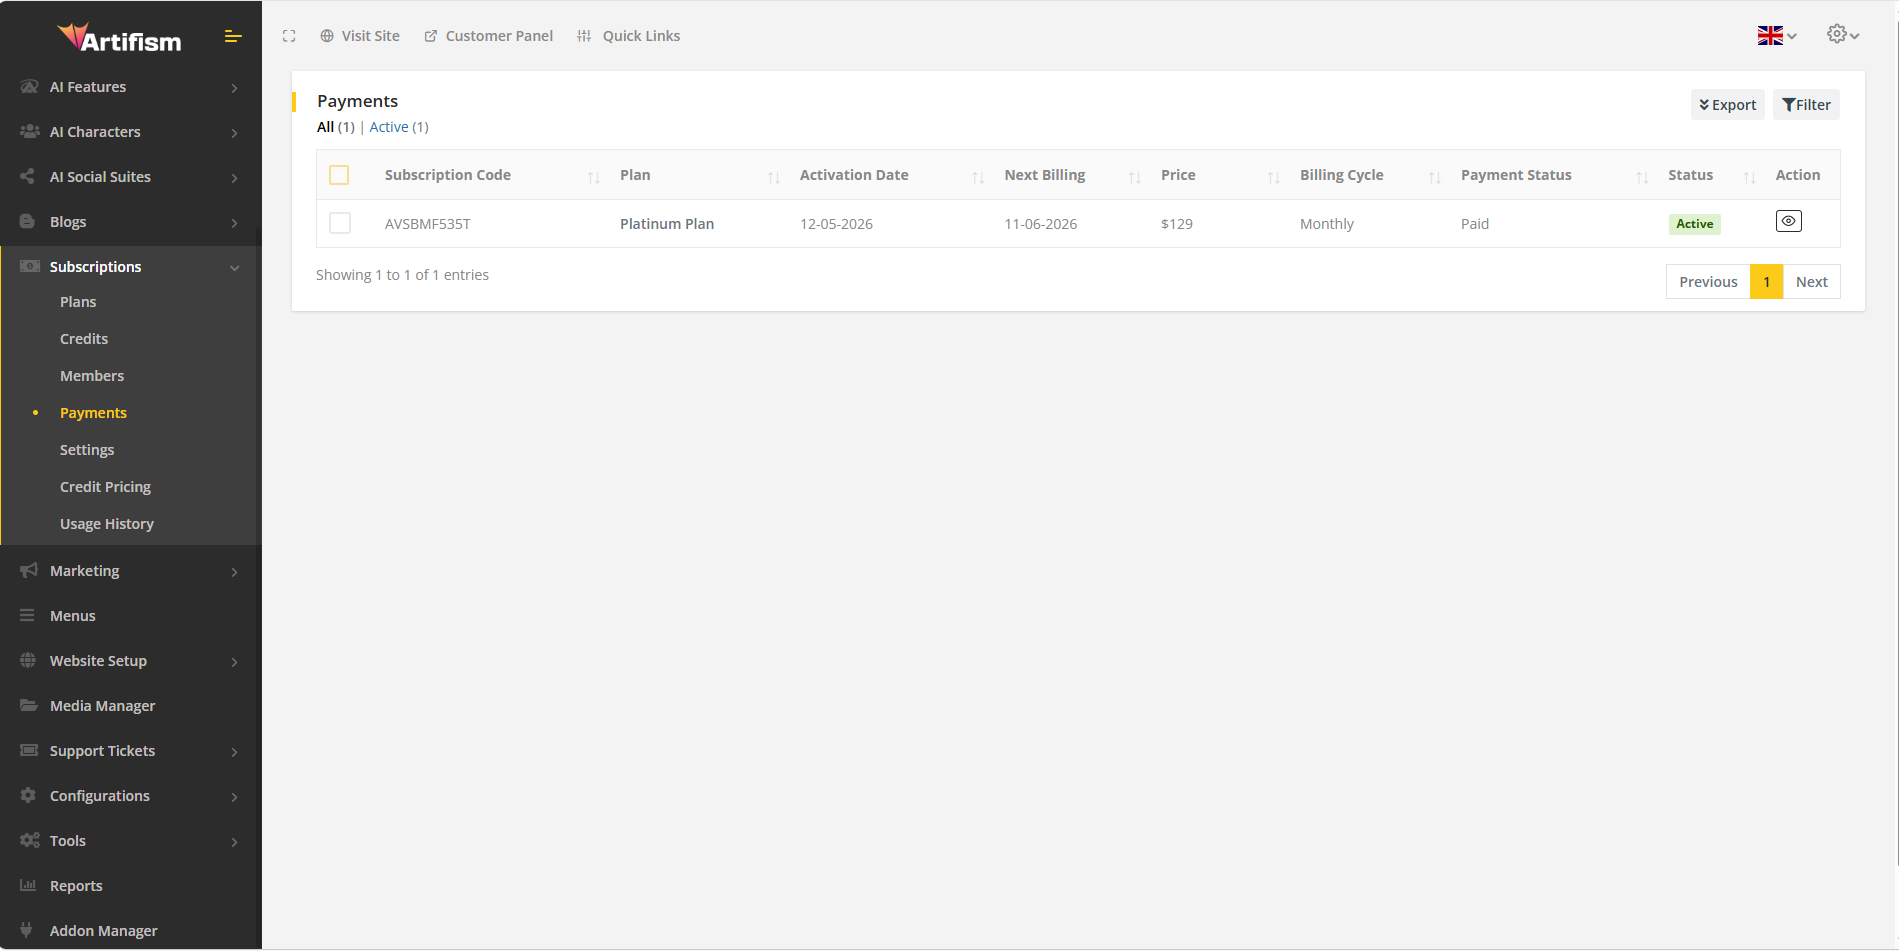
Filters
| Filter | Options |
|---|---|
| Search | Keyword search across the list. |
| Status | Active, Inactive, Pending, Expired, Cancel (subscription-related payment state). |
| Type | Subscription (recurring plan payments) or Onetime (credit pack purchases). |
List actions
| Action | What it does |
|---|---|
| Preview (eye icon) | Opens the invoice view for that payment. |
| Export | Download payment list as CSV or PDF. |
| Delete | Remove a payment row (rare; use with care). |
Preview an invoice
- On Payments, click the Preview (eye) icon on a row.
- The Invoice page opens.

On the invoice page you can:
| Button | What it does |
|---|---|
| Send the invoice to the customer’s email. | |
| Open or download a PDF copy. | |
| Pay Now | For some one-time (credit) payments that are Unpaid, marks or processes payment (when shown). |
The invoice shows your company details, bill to customer information, line items, amounts, and status badges (Paid / Unpaid, subscription status).
After emailing: The customer receives a PDF attachment according to your email setup.
Settings
What Settings are
Settings control global rules for all customers: whether they can change plans, downgrade, how renewals work, and which credit balance is spent first.
Go to: Subscriptions → Settings
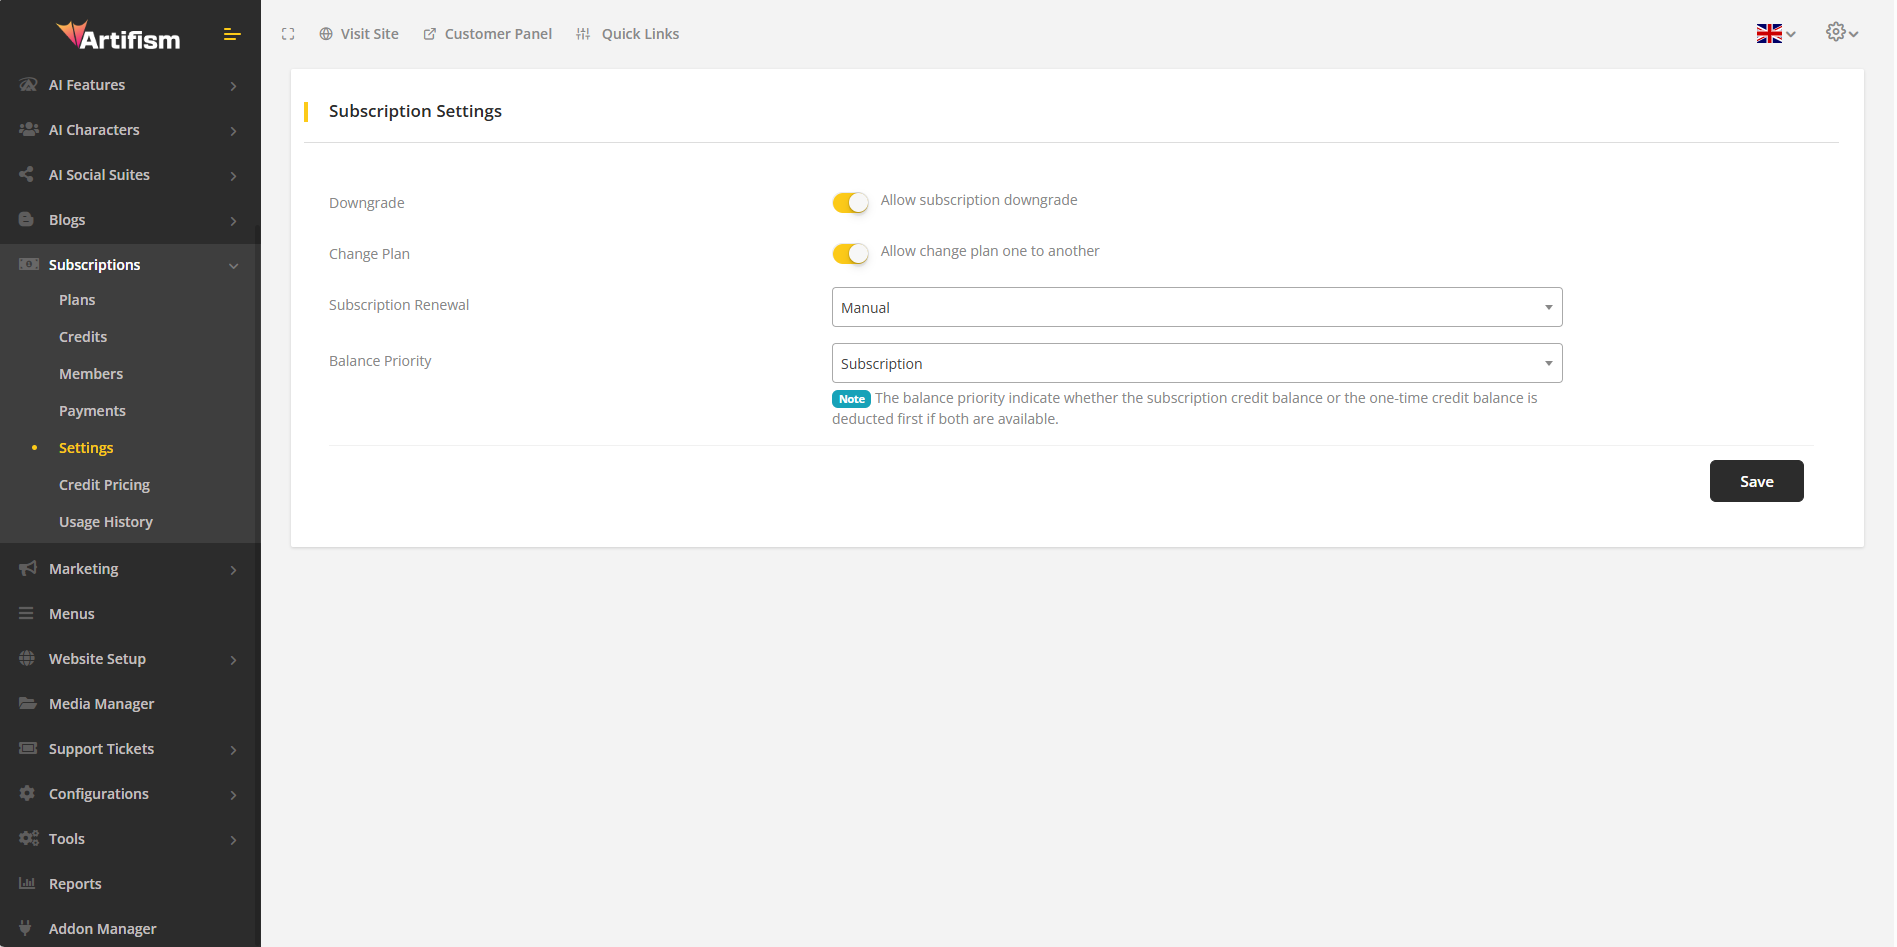
Always click Save after making changes.
Downgrade
| Setting | When ON | When OFF |
|---|---|---|
| Downgrade (Allow subscription downgrade) | Customers may move to a cheaper plan when the product allows it. | Downgrade is not allowed. Customers may still upgrade to a higher plan if change plan is on. |
Customer experience: On the pricing or subscription page, lower-tier plans may appear as Downgrade options when this is ON.
Note: If downgrade is OFF, after a customer picks a higher plan they will not see downgrade paths to cheaper plans.
Change Plan
| Setting | When ON | When OFF |
|---|---|---|
| Change Plan (Allow change plan one to another) | Customers can switch between eligible plans (upgrade and/or downgrade per downgrade rule). | No plan switching—customers stay on the plan they bought until it ends. |
How it works with Downgrade:
| Change Plan | Downgrade | Result for customers |
|---|---|---|
| ON | ON | Can upgrade and downgrade. |
| ON | OFF | Can upgrade only, not downgrade. |
| OFF | (any) | Cannot change plans at all. |
Subscription Renewal
Controls how the next billing period is paid:
| Option | What it means for customers |
|---|---|
| Manual | The customer must pay each cycle themselves (for example click renew and pay every month). |
| Automate | The system charges automatically on the renewal date (requires a working payment gateway). |
| Customer Choice | Each customer can pick manual or automatic renewal in their account when that screen is available. |
Best practice: Use Automate only after you have tested your payment gateway. Use Customer Choice when you want flexibility.
Balance Priority
Applies when a customer has both:
- Subscription credits (their allowance from the current billing cycle), and
- One-time credit pack balance they purchased separately.
| Option | What happens when they generate content |
|---|---|
| Subscription | Use the subscription balance first. |
| Onetime | Use the one-time credit pack balance first. |
Example: You sell monthly plans plus small top-up packs. If you want top-ups used before monthly credits, choose Onetime.
Credit Pricing
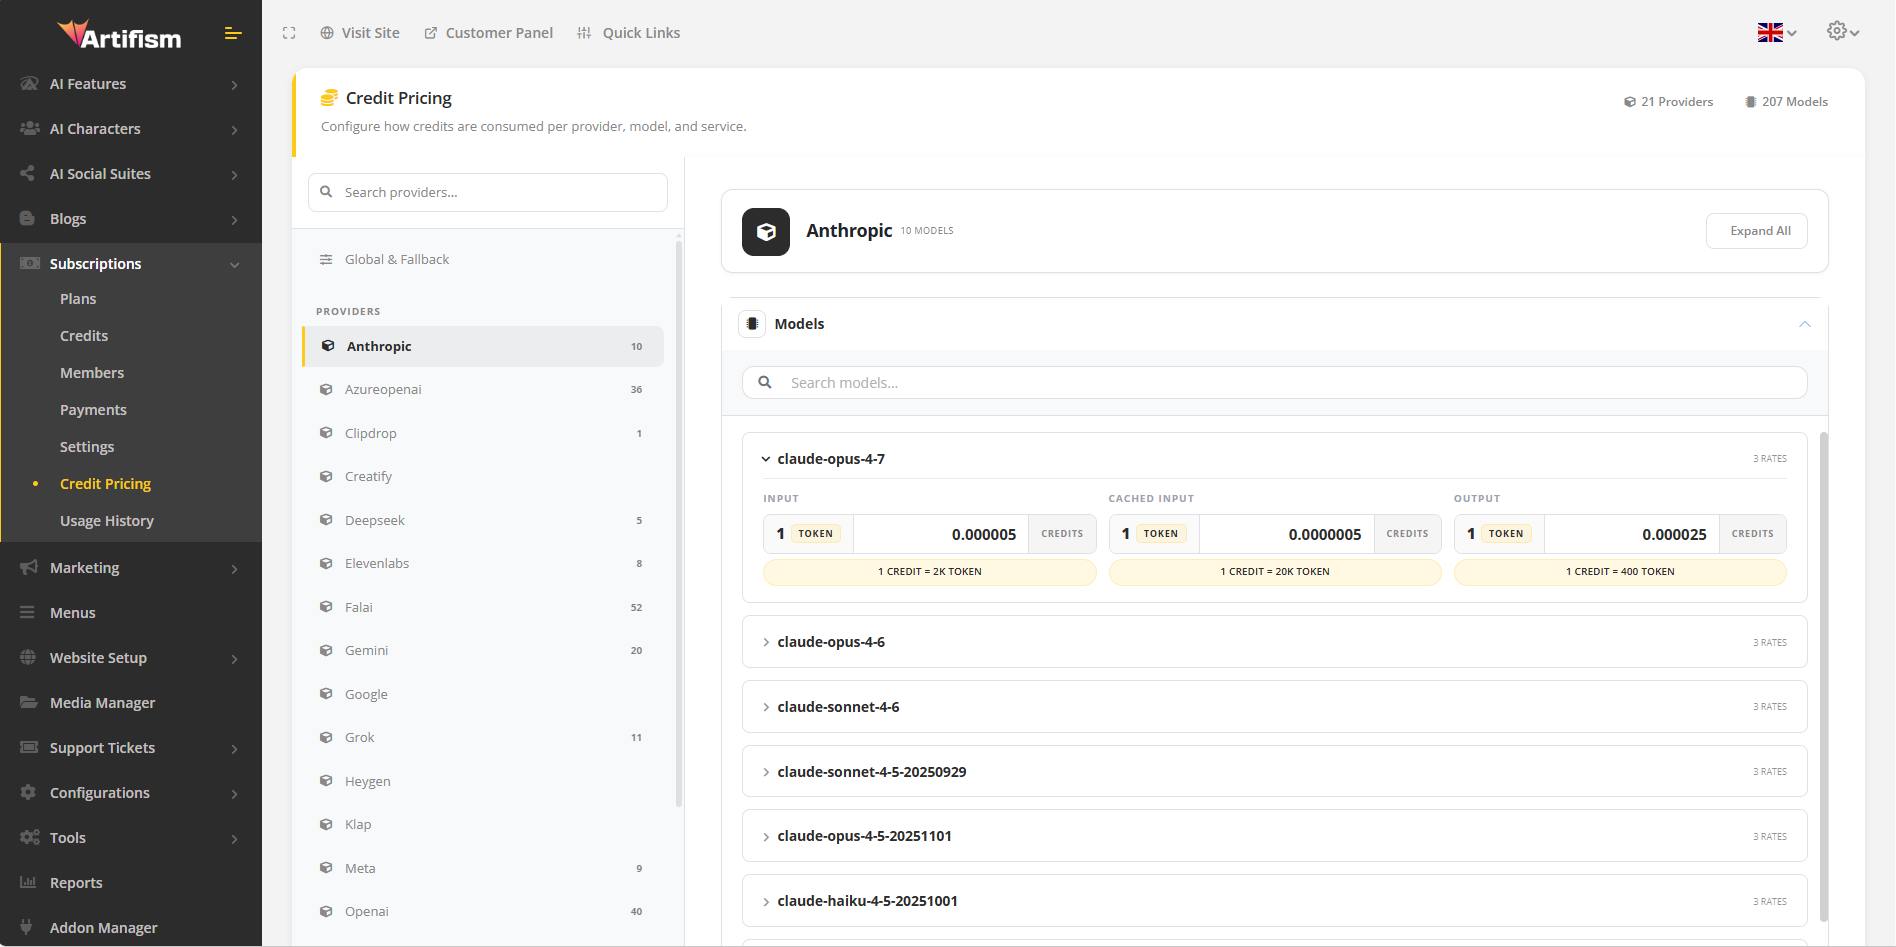
What Credit Pricing is
Credit Pricing defines how many credits each AI action costs. You can set rates by provider, model, or service type (text, image, video, and so on).
Admins can edit these rates here. Customers only view them in their account on the read-only Credit pricing page.
The same pricing is shown in the user panel, and credit usage is deducted automatically based on the rate you set.
Why you use Credit Pricing
- One unified credit pool can power many tools instead of separate word/image counters.
- Different models can cost different amounts, so you can match pricing to your costs.
- You can adjust your pricing strategy without changing every plan.
How to manage Credit Pricing
Go to: Subscriptions → Credit Pricing
What you typically configure
| Item | Meaning |
|---|---|
| Base credit value | The foundation for converting real usage into credits. |
| Provider / model rows | Each row sets how many credits are charged per use, or per unit such as 1K tokens. |
| Service type | Optional grouping such as chat, image, or video when your build shows it. |
Step-by-step: update a model rate
- Open Subscriptions → Credit Pricing.
- Find the provider and model (expand sections if the list is grouped).
- Change the credit rate for that row.
- Click Save.
What happens after Save:
- New AI runs use the updated rates.
- Past usage history rows are not recalculated—they stay as logged.
Tip: Review provider costs and set rates based on your region and target market. Update prices gradually and tell customers in advance if credit costs increase sharply.
Warning: Setting a rate to zero by mistake can let a model be used for free—double-check before saving.
Usage History
What Usage History is
Usage History is an admin log of AI activity across your customers: what was run, when, and how credits were charged from their balance.
It is different from a single customer’s own usage view—they only see their rows; you see everyone (subject to your permissions).
Why you use Usage History
- Support: A customer says “I lost credits”—find the exact run and time.
- Auditing: Review heavy usage or unusual patterns.
- Reporting: Export data for your records.
How to use Usage History
Go to: Subscriptions → Usage History
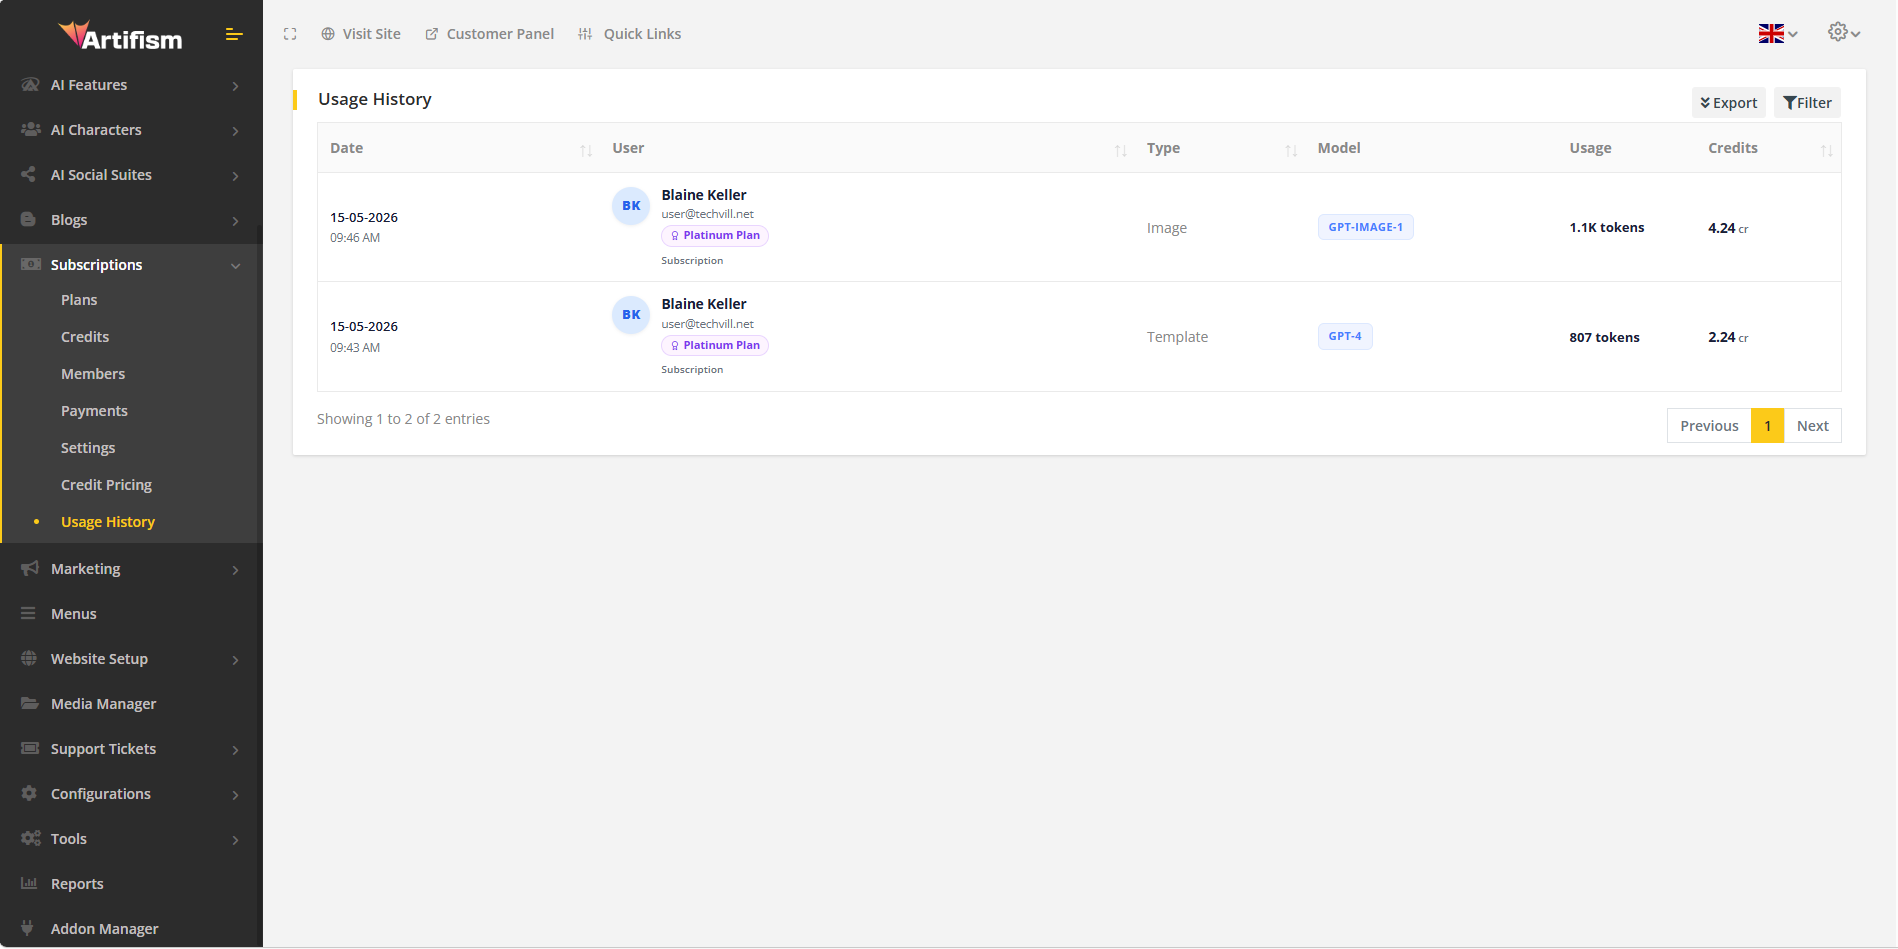
Typical columns
| Column | Meaning |
|---|---|
| User | Which customer ran the action. |
| Date / time | When it happened. |
| Tool / model | What was used. |
| Credits used | How many credits were charged. |
| Details | Extra context (prompt type, job id, etc.) if shown. |
Actions you can take
- Filter by date range, user, or tool type when filters are available.
- Sort columns to find the newest or largest usage.
- Export to CSV or PDF for offline analysis (when your role allows).
Best practice: When a customer contacts support, ask for the approximate date and tool name, then search here before adjusting their balance manually.
Customers (short version)
Customers buy on Pricing (subscription or credit pack) and manage everything under Account: plan, credits, bills, teams (if on), credit prices, usage. They need a paid plan and/or credits before paid AI features work. Full walkthrough: User account.
Where to click (admin)
In the admin sidebar, open Subscriptions. You will see:
- Plans
- Credits
- Members
- Payments
- Settings
- Credit Pricing
- Usage History
Words you will see
- Plan — recurring or lifetime package.
- Credit pack — one-time credit purchase.
- Member — one row in Members for a customer’s subscription.
- Billing cycle — how often they pay.
- Active / Pending — working vs waiting on payment.
- -1 on a credit field often means unlimited (when your build supports it).
- Onetime — credit pack, not a recurring plan.
- Balance priority — use subscription credits or pack credits first.
Troubleshooting (common questions)
Customers do not see my new plan on Pricing.
Check the plan Status is Active, a billing cycle is enabled with a price, and the customer is looking at the Subscription tab—not the Credit tab.
Customer paid but status is still Pending.
Open Members, find their row, edit Payment Status to Paid and Status to Active if you confirmed payment manually. Also check Payments for the invoice.
Customer cannot downgrade.
Open Settings → ensure Change Plan is ON and Downgrade is ON.
Credits run out too fast after a pricing change.
Check Credit Pricing for recent edits. New rates apply only to new usage.
I deleted a plan by mistake.
You may need to recreate it and reassign members manually under Members. Restore from backup if your host provides one.
End of administrator manual.