WhatsApp Cloud API Setup Guide
This guide will walk you through setting up WhatsApp Cloud API step by step. Follow each section carefully to get your WhatsApp business account ready.
What You'll Need Before Starting
- A verified Facebook Developer account
- A Meta Business Manager account
- Access to WhatsApp Business Account
Step 1: Create a Meta Developer Account
- Open your web browser and go to: https://developers.facebook.com
- You'll see the Meta for Developers homepage. Click on the "Log in with Facebook" button in the top right corner.
- If you don't have a developer account yet, click "Create new account" and follow the registration process.
Step 2: Create Your First App
Once you're logged in, it's time to create an app where WhatsApp will be connected.
- Look for "My Apps" in the top navigation menu and click it.
- Click the green "Create App" button.
- Fill in the following information:
- App Name: Give your app a name (e.g., "My WhatsApp Business")
- Contact Email: Enter your email address
- In the next step, you'll be asked to select a "Use Case".
- After entering app details, click "Next" to go to the Use Cases page.
- You'll see many different use cases. For WhatsApp Cloud API, you MUST select "Connect with customers through WhatsApp."
- You can filter by "Business messaging" on the left to find it easily.
- Click the checkbox next to "Connect with customers through WhatsApp" to select it.
- You'll see "1 use case added" at the bottom. Then click "Next."
- You must create a Business Portfolio to activate and use WhatsApp.
🔗 Create App Reference | � Use Case Reference | 🔗 Business Portfolio Reference
Step 3: Add WhatsApp to Your App
Great! Now your app is created. The next step is to add WhatsApp functionality to it.
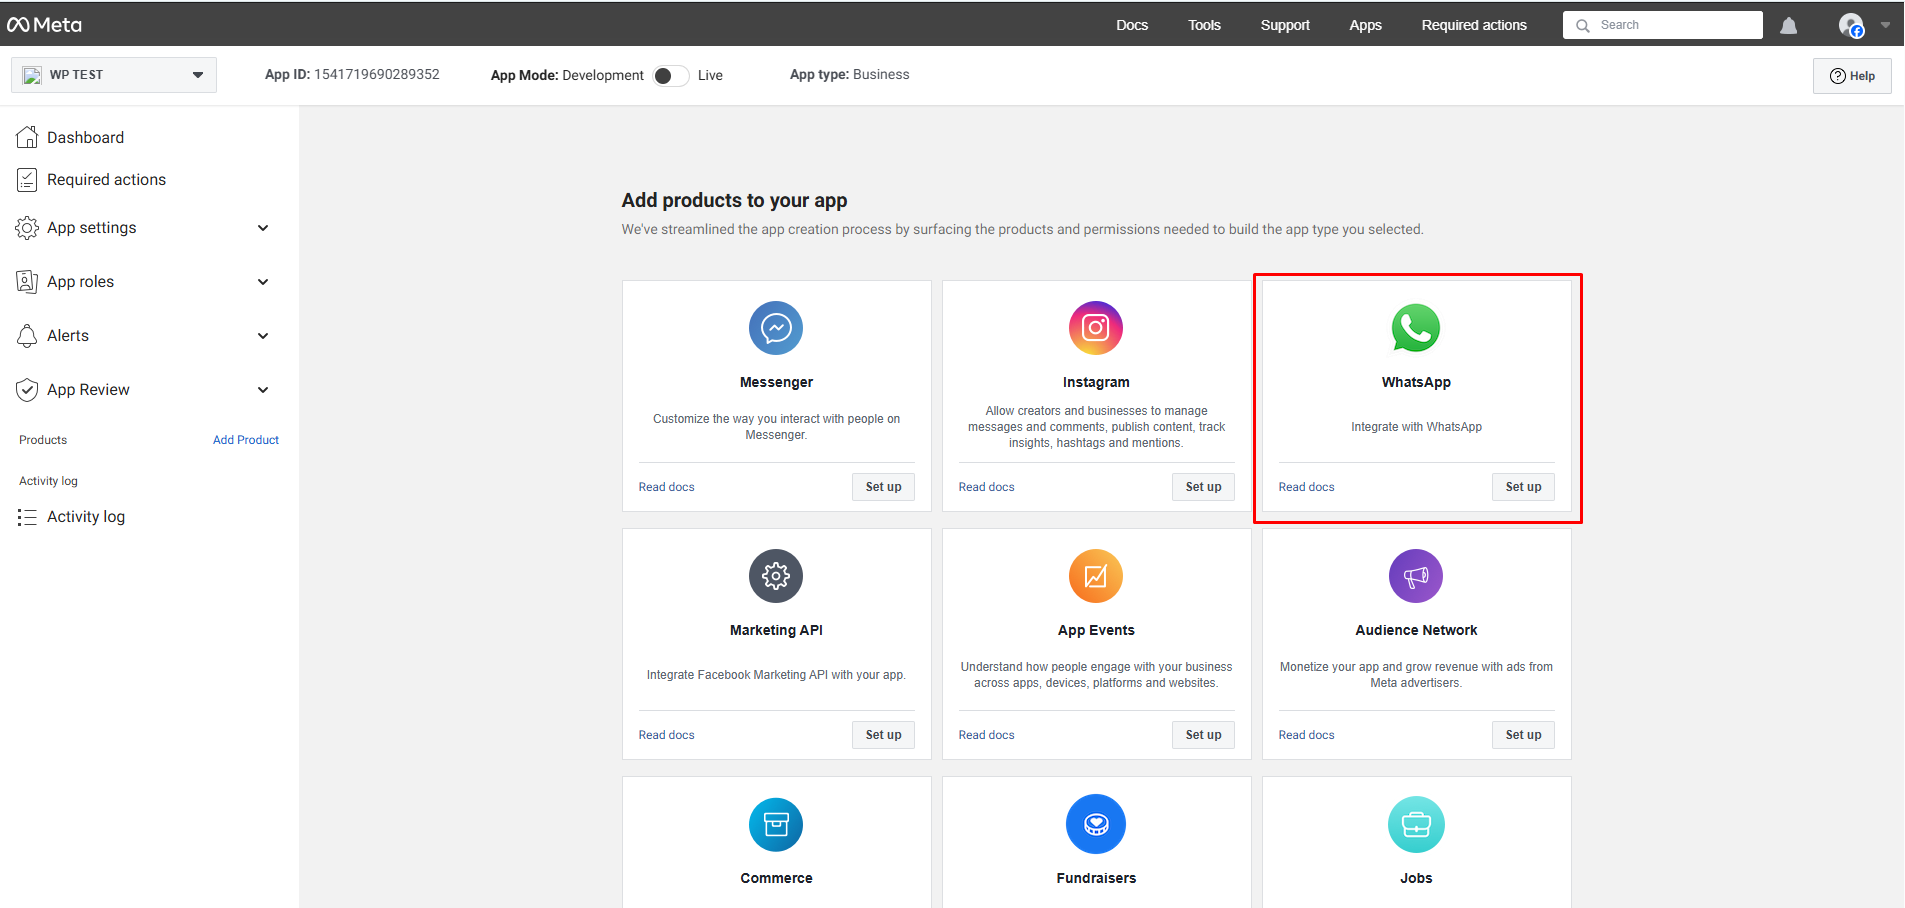
- After creating the app, you'll be taken to your App Dashboard.
- Scroll down and look for a card/box that says "WhatsApp" with the WhatsApp logo.
- Click the "Set up" button on the WhatsApp card.
 4. Accept the WhatsApp Terms of Service when prompted.
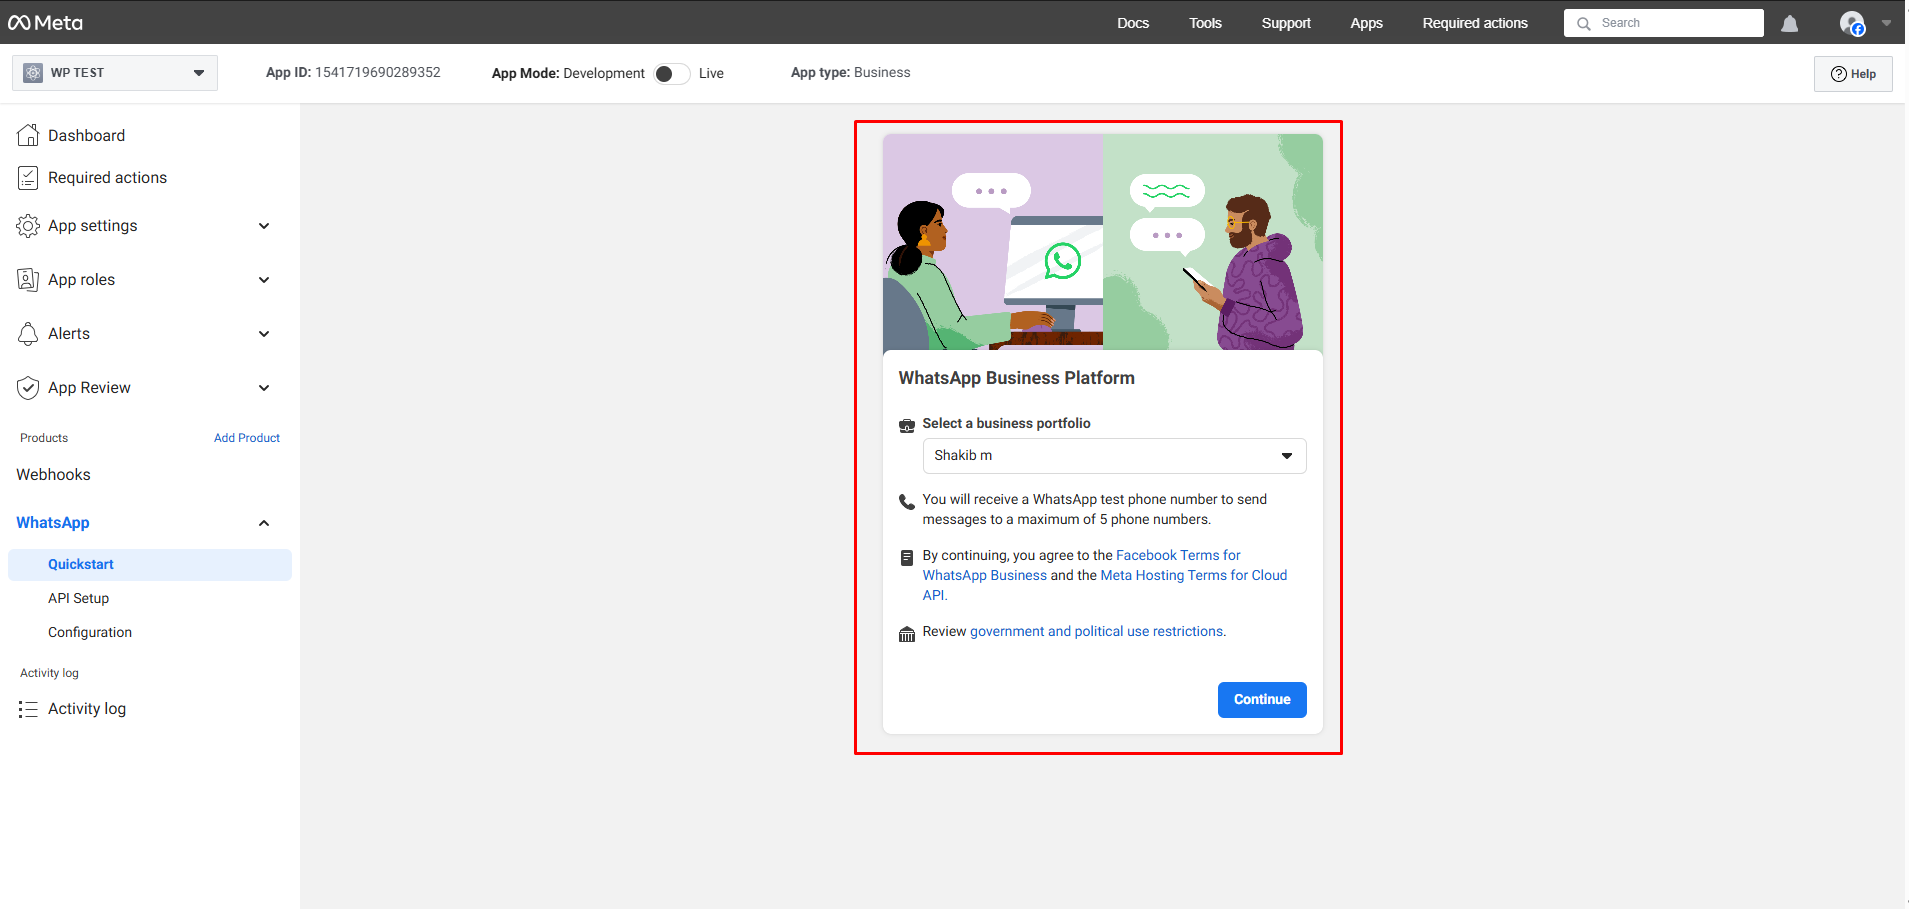 5. You'll see a confirmation that WhatsApp has been added.
Step 4: Get Your Access Token
The access token is like a key that allows your app to send WhatsApp messages. Don't worry, getting it is easy!
- After setting up WhatsApp, you'll see a menu on the left side. Click on "WhatsApp" to expand it.
- Click on "API Setup" under the WhatsApp menu.
- You'll see a section called "Temporary access token." This is already generated for you!
- Click the "Copy" button next to the token to copy it.

Important
Save this token somewhere safe (like a notepad file). You'll need it later!
Tip
This temporary token lasts for 24 hours. For permanent use, you'll need to generate a system token later.
Step 5: Add Your WhatsApp Number
This is where you'll connect your business phone number to WhatsApp.
Connect Your Phone Number:
- In the WhatsApp section of your app, click "Add Phone Number."
 2. Fill in your business information (company name, address, etc.)
 3. Click "Next."
4. Enter your business mobile phone number.
* Important: This number must NOT be linked to any existing WhatsApp account (personal or business).
5. Choose how you want to receive the verification code (SMS or Voice call).
6. Enter the 6-digit verification code when you receive it.
7. Wait for the confirmation message that your phone number is connected.
3. Click "Next."
4. Enter your business mobile phone number.
* Important: This number must NOT be linked to any existing WhatsApp account (personal or business).
5. Choose how you want to receive the verification code (SMS or Voice call).
6. Enter the 6-digit verification code when you receive it.
7. Wait for the confirmation message that your phone number is connected.
Step 6: Send Your First Test Message!
This is the exciting part—let's send your first WhatsApp message through the API!
- Still on the "API Setup" page, find the "Send and receive messages" section.
- Make sure:
- "From" field shows your test phone number
- "To" field has your verified phone number selected
- Click the blue "Send message" button.
- Check your WhatsApp! 📱 You should receive a message saying "Hello World" (or a similar test message).
✅ Success! You've successfully sent a WhatsApp message using the Cloud API!
Step 7: Set Up a Webhook
Webhooks let WhatsApp send notifications to your app when someone messages you or when your messages are delivered/read. This step is optional for testing but important for production apps.
Configuration Steps:
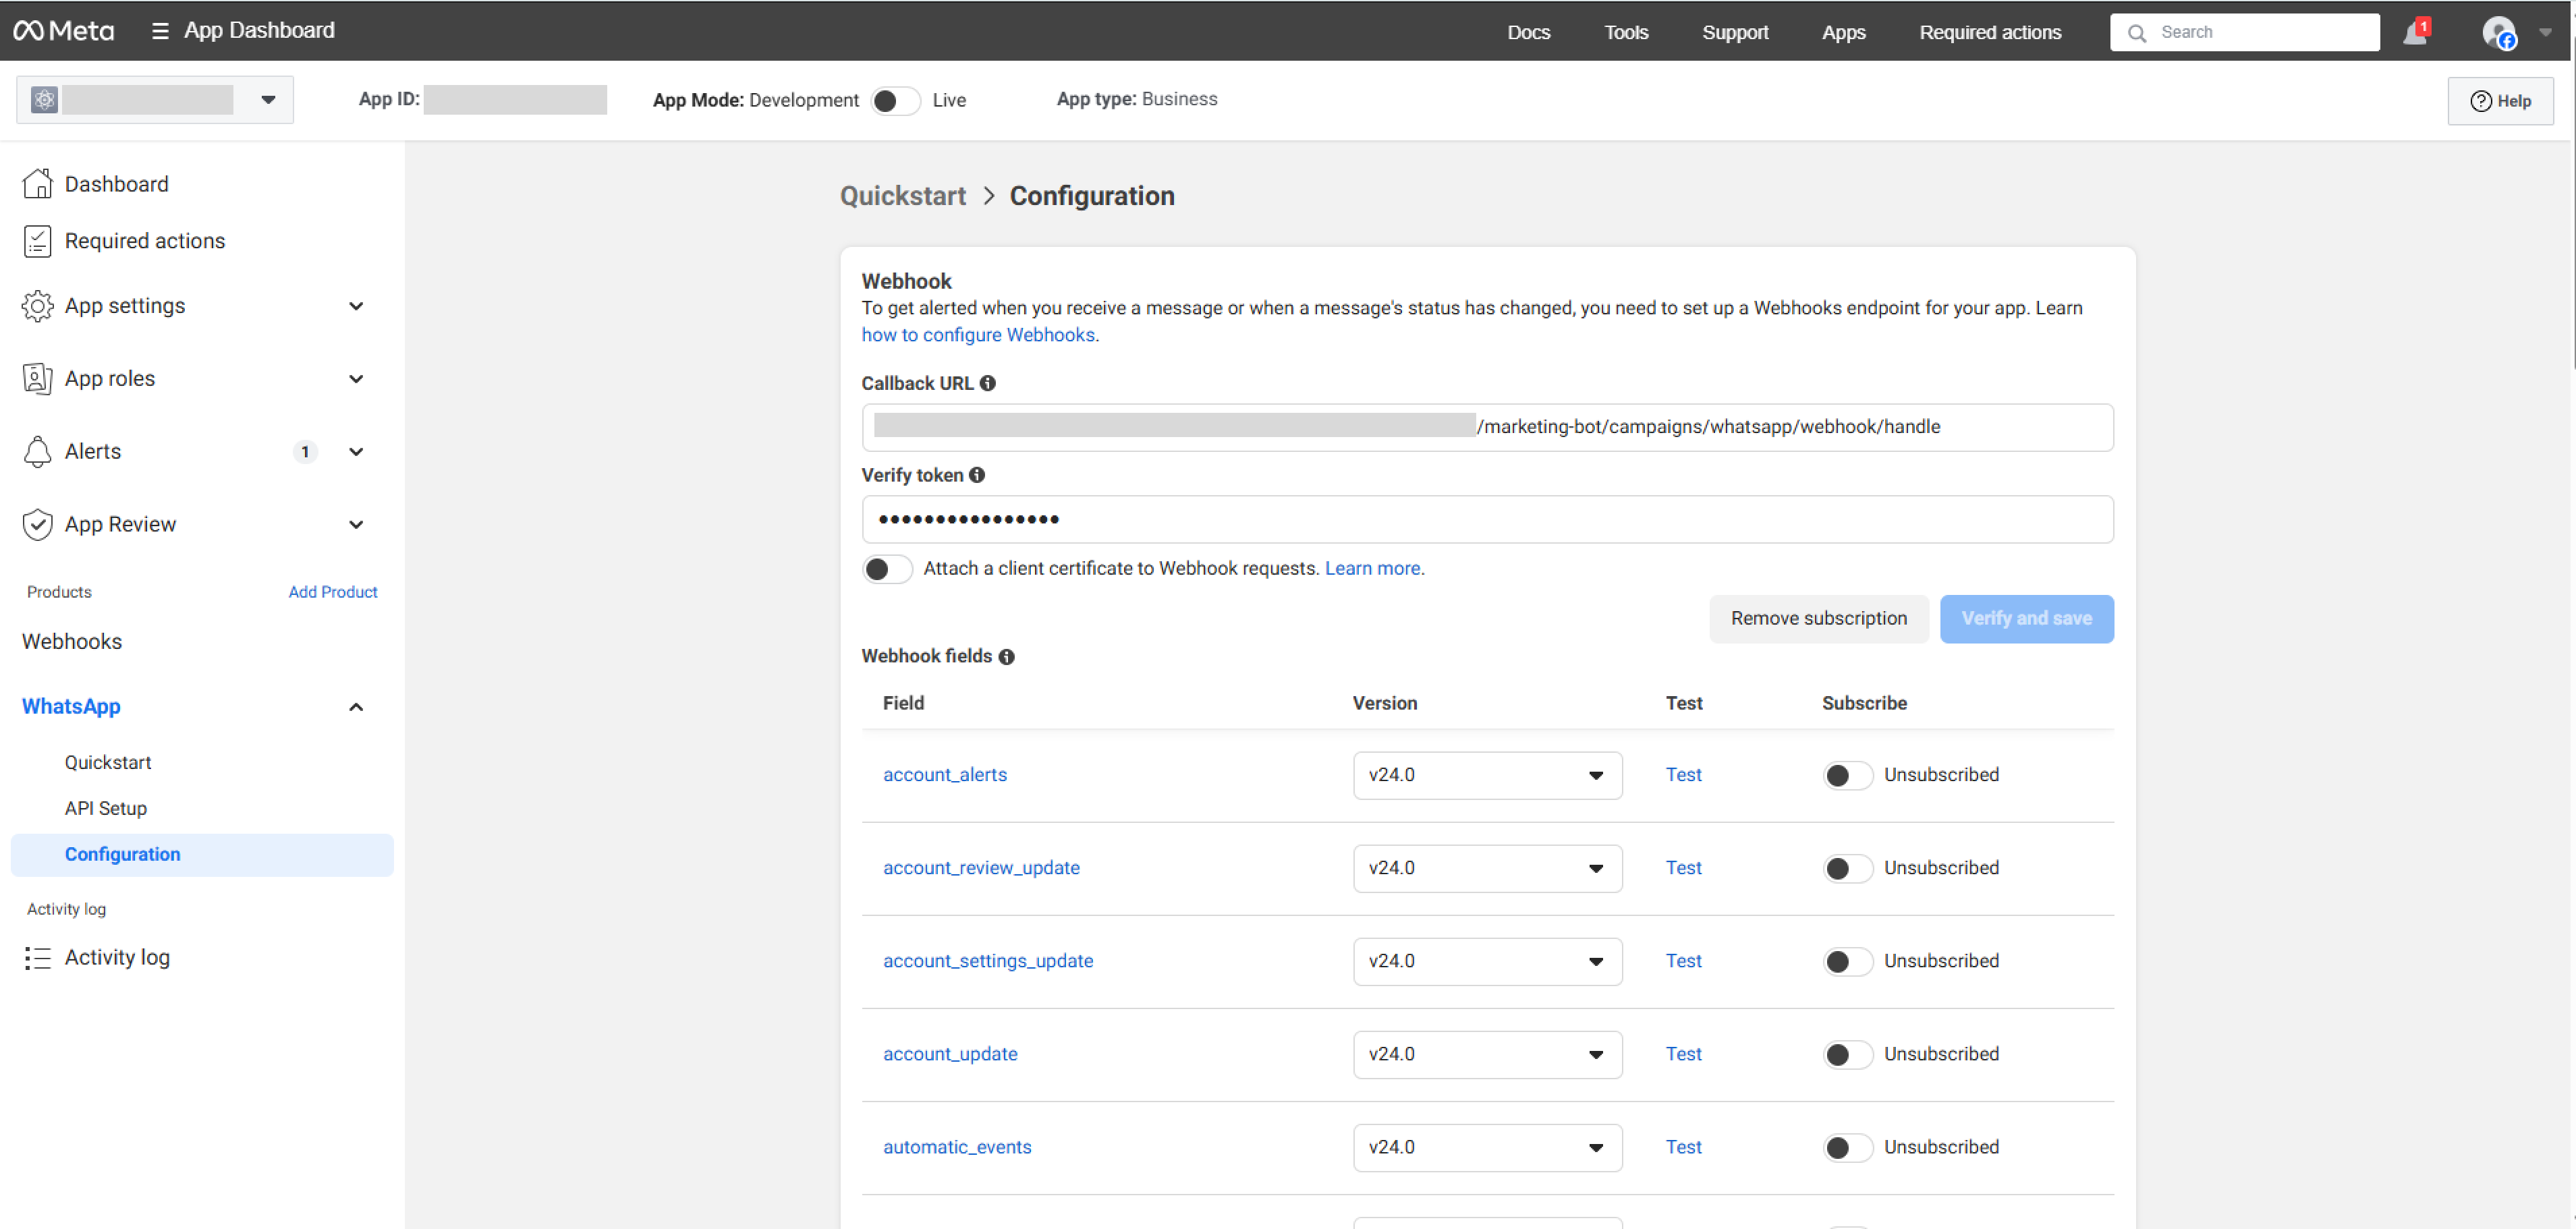
- In the left sidebar, click on WhatsApp > Configuration.
- Configure Webhook Fields:
- Callback URL: Enter your HTTPS webhook endpoint URL
- Verify Token: Enter a secure string (you'll need this in your code)
- Note: Use your access token.
- Subscribe to Webhook Fields:
- After verification succeeds, you'll see "Webhook fields."
- Subscribe to the events you want to receive:
messages: to receive incoming messagesmessage_status: to see if messages were delivered/readmessage_template_status_update: Template approval status
- Click "Subscribe" for each field you need.
- Click "Verify and Save" to apply changes.
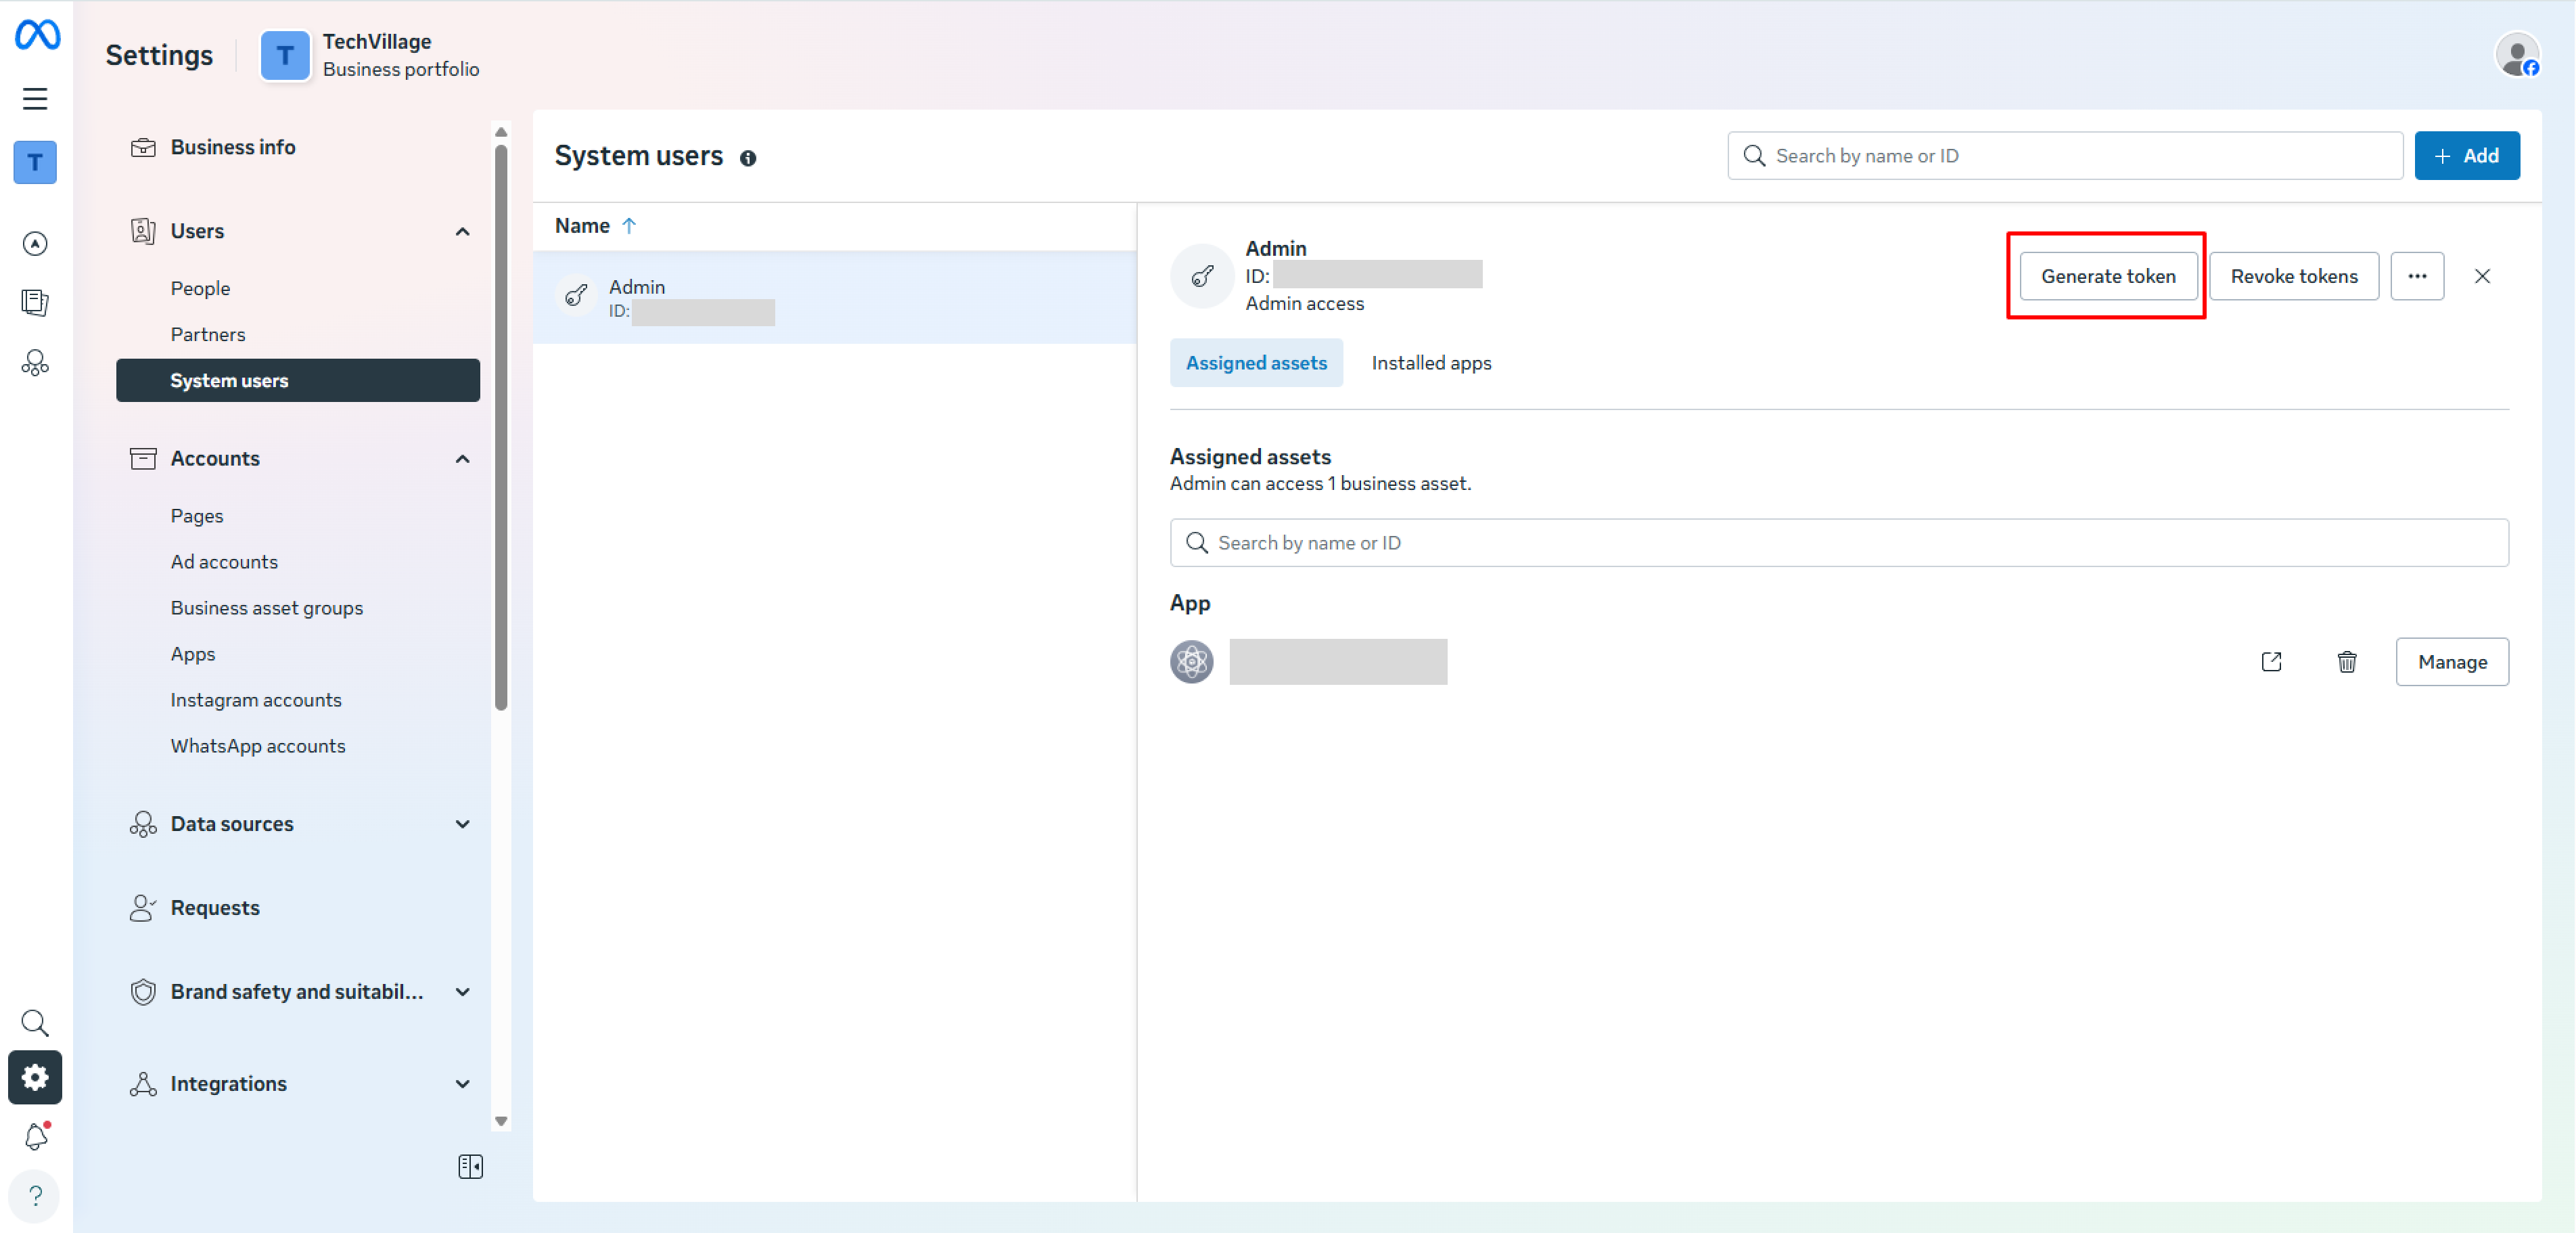
Step 8: Create a Permanent Access Token
This is like a special password that lets Artifism connect to WhatsApp.
- Go to business.facebook.com
- Navigate to "Business Settings → Users → System Users → Add" to create a new system user.
- Give it a name you prefer.
- Select "Admin" as the role.
- Click "Create System User."
 6. After creating the System User, click on the user name and select your app.
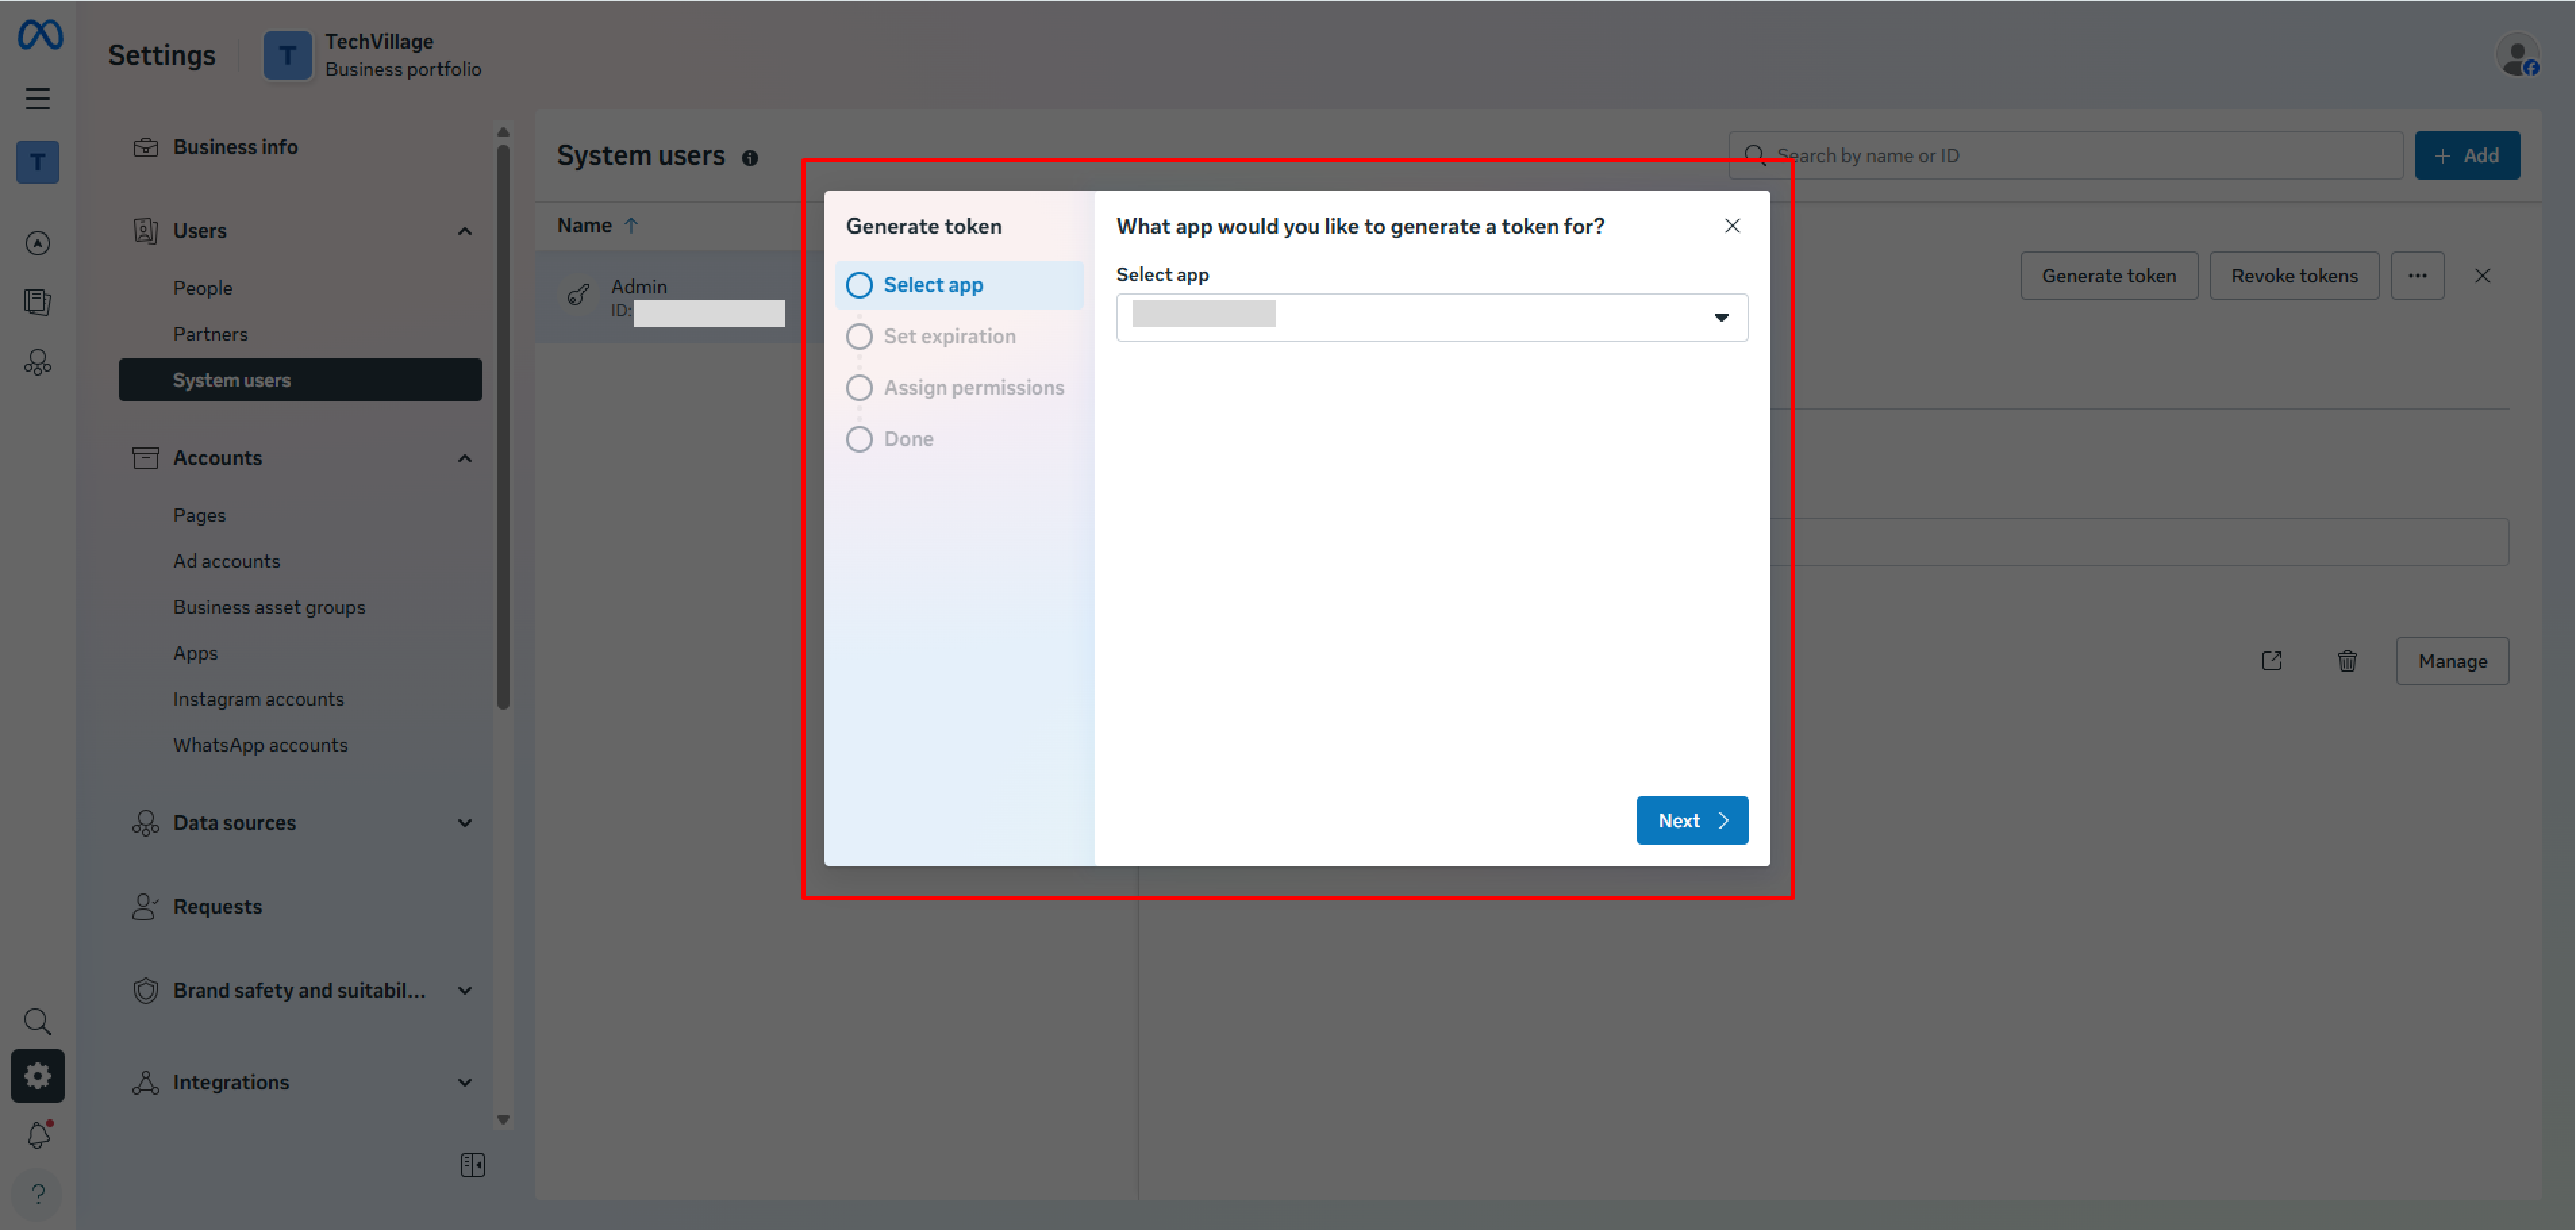 7. Grant all the permissions it needs.
8. Select these permissions when asked:
7. Grant all the permissions it needs.
8. Select these permissions when asked:
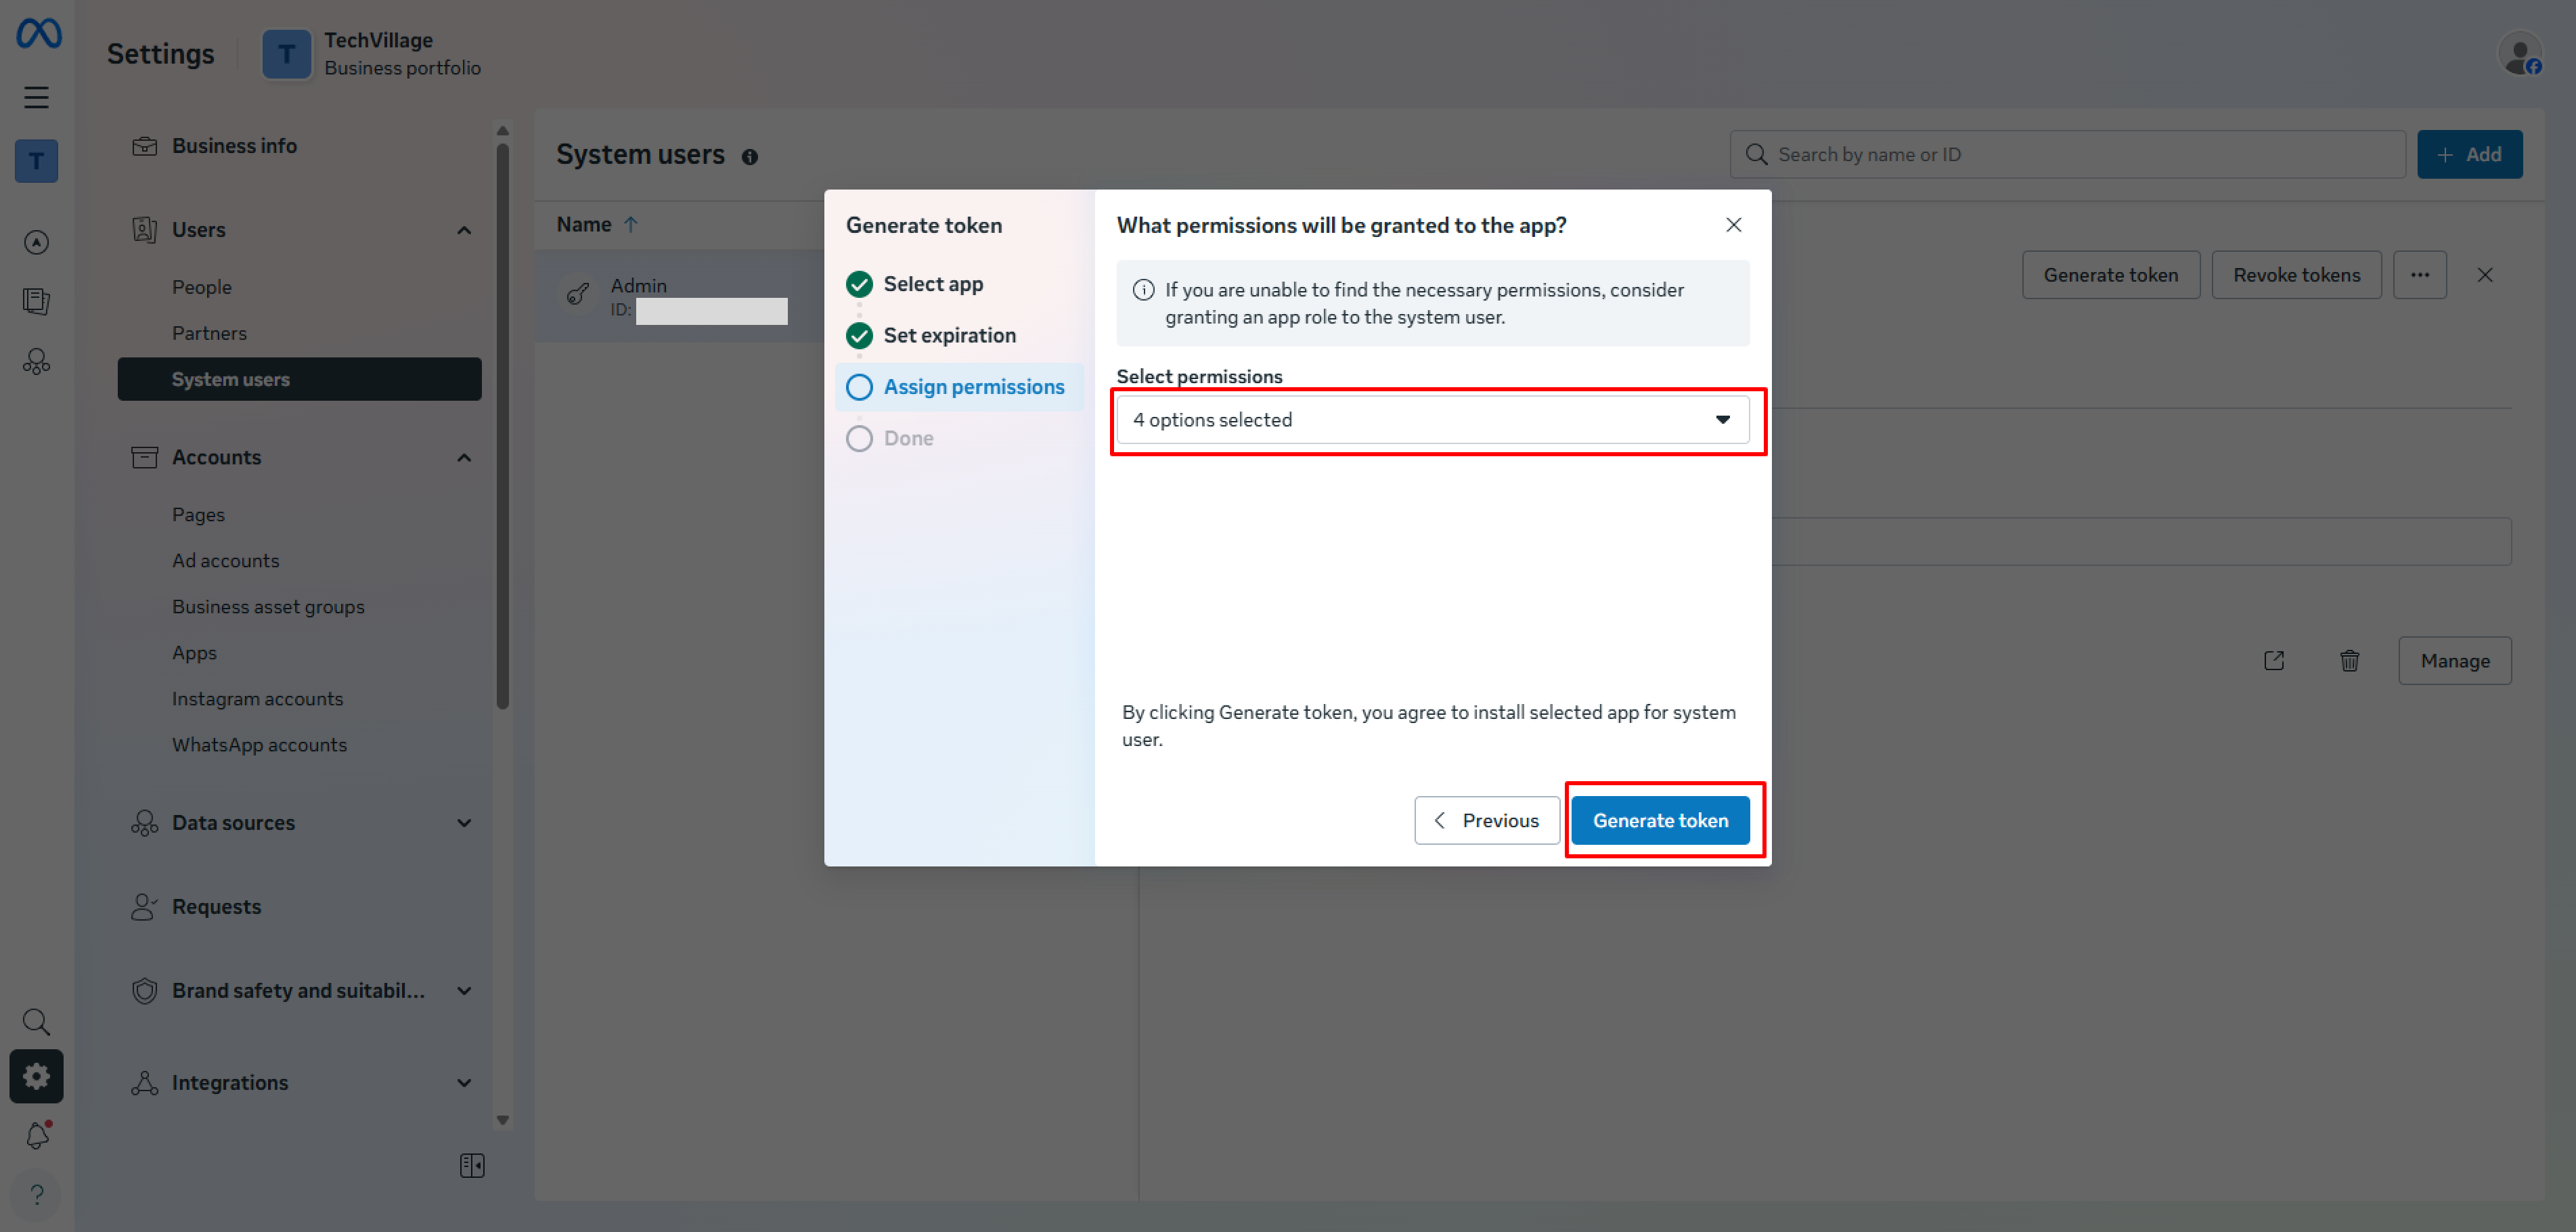 * ✓ WhatsApp Business Management
* ✓ WhatsApp Business Messaging
* ✓ Business Management
* ✓ Pages Messaging
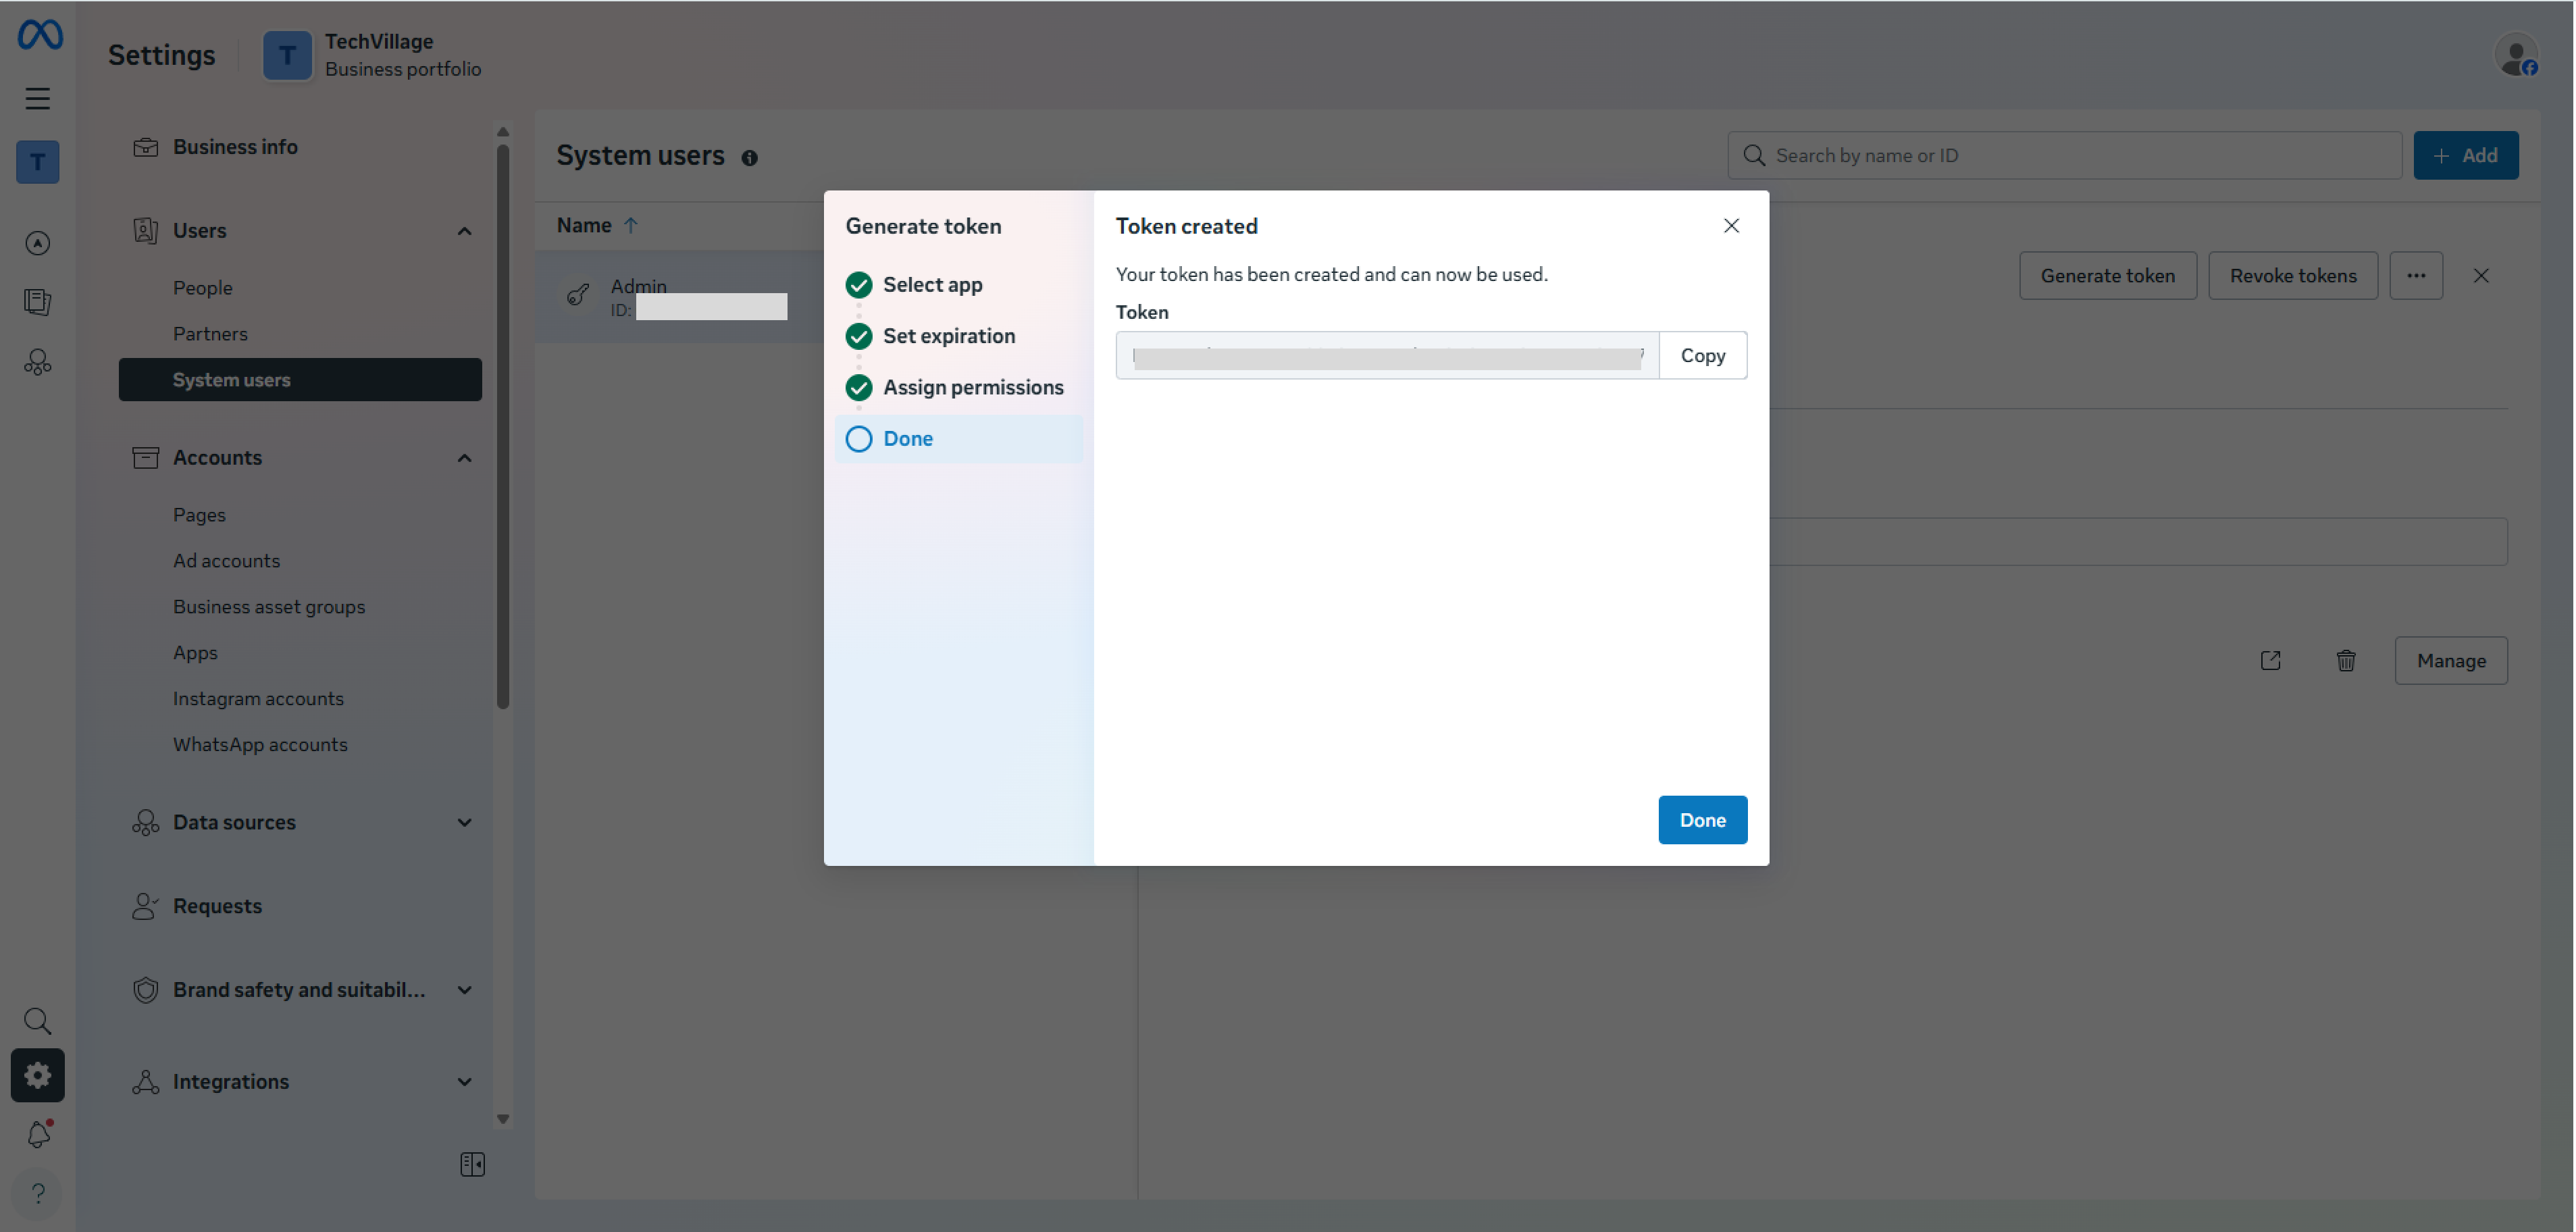
9. Copy the token that appears and save it somewhere safe (you'll need it in the next step).
* ✓ WhatsApp Business Management
* ✓ WhatsApp Business Messaging
* ✓ Business Management
* ✓ Pages Messaging
9. Copy the token that appears and save it somewhere safe (you'll need it in the next step).
Important Things to Know
🔒 Test Mode Limitations
- You can only send messages to up to 5 verified phone numbers.
- Your test phone number can only send 250 messages in 24 hours.
- You can only use pre-approved message templates.
🚀 For Production Use (Real Business)
When you're ready to use WhatsApp API for your real business, you'll need to:
- Complete Business Verification with Meta.
- Add a payment method to your account.
- Register your own phone number (not the test one).
- Create and submit your message templates for approval.
- Get your app reviewed by Meta (if needed).
Helpful Resources
- 📚 Official Documentation: https://developers.facebook.com/docs/whatsapp/cloud-api
- 👥 Community Support: https://developers.facebook.com/community
- 📊 Business Manager: https://business.facebook.com